Rust 基本教學
Hello World!
不使用管理工具編寫程式
- 建立副檔名為
.rs的檔案 ex:main.rs - 寫 main function,程式碼編譯過後,會以 main function 作為進入點 ```rust fn main () {
}
3. 印出 `Hello World!`
```rust
fn main () {
    println!("Hello World");
}
- 編譯程式碼
rustc main.rs - 編譯完後會產生
main/main.exe檔,執行main/main.exe檔./main
使用 Cargo 管理專案
- 建立專案
cargo new hello_world - 編輯
src/main.rs的檔案fn main() { println!("Hello, world!"); } - 檢查專案是否可以編譯得過
cargo check - 編譯
cargo build - 執行
cargo run - 優化編譯
cargo build --release
Hello World 的程式碼解析
fn main () {} // fn 是 function 的關鍵字
println!("Hello World!") // println 是印出資料的語法,! 是 macro 的寫法, println! 是官方的 macro ,會在編譯時期根據目標平台轉換成相應的程式碼
宣告變數
- 在 rust 中,可以不用宣告型別,也會由編譯器自行推定
fn main () { let x = 5; // 會被自行推定為 i32 let y: i32 = 10; // 也可以宣告變數型別 } - 預設所有變數都是不可變的
fn main () { let x = 5; x = 10; // 不可以改變 x 的值 } - 若要改變變數,必須宣告
mutfn main () { let mut x = 5; x = 10; // OK } - 可以用 tuple 或 struct 的方式宣告多個變數並同時賦值
fn main () { let (a, b) = (1, 2); let (mut x, mut y) = (1, 2); // 或宣告可變的變數 } - 可以事先宣告變數,但若變數被宣告後沒有初始化,同時在之後被使用到,會編譯不過
fn main () {
  let x: i32;
  println!("{}", x); // use of possibly-uninitialized `x`
}
fn main () { let x: i32; let condition = true; if condition { x = 1; // 因為在這裡被初始化了 println!("{}", x); // 所以可以使用 } // 但在這裡沒有被初始化 println!("{}", x); // 在這裡會出錯 } 有的時候會在接別人的 API 時,遇到用不到,但必須寫出來的變數,可以用
底線帶過,就可以讓編譯器閉嘴,讓編譯器忽略沒有使用到這個變數,但同時底線變數也被視為不能被使用的變數,所以不可以在後面的程式碼中使用到fn main () { let _ = "hello"; println!("{}", _); // expected expression }如果在寫程式的途中,想要命名一個跟前面名稱一模一樣的變數是可以的
fn main () {
  let x = "Hello";
  println!("{}", x);

  let x = 5; // 前面的變數會被 shadowing
  println!("{}", x);
}
可以用
type為一個型別取新的名字type Age = u32; fn grow (age: Age, year: u32) -> Age { age + year }宣告靜態變數
static GLOBAL: i32 = 0;宣告常數
const GLOBAL: i32 = 0;
型別種類
- bool
- char
- 數字
- array
let a = [1, 2, 3]; let first = a[0]; let second = a[1]; - tuple
let a = ("hello", 1) - struct ```rust struct Person { age: u32, weight: u32, }
fn main () { let ballfish = Person { age: 18, weight: 40 }; println!("{}, {}", age, weight); }
- tuple struct
```rust
struct Color (i32, i32, i32);
- enum ```rust enum Food { Noodle, Rice }
enum Message { Quit, ChangeColor(i32, i32, i32), Move { x: i32, y: i32 }, }
## if/else、loop、function
- 用大括號括起來的區塊,可以放在等號後面,最後一行不寫分號,會被視為回傳直傳出去
```rust
fn main () {
    let x = { println!("喵喵喵喵"); 5 };
    println!("{}", x);
}
if/else
fn main () {
  let n = 4;
  if n < 0 {
      println!("Wow");
  } else if n == 0 {
      println!("owo");
  } else {
      println!("Orz");
  }
  // Orz
}
Rust 並沒有三元運算子(ex: n < 0 ? "owo" : "OAO"),但可以把 if/else 寫成下面這樣
fn main () {
  let n = 4;
  let x = if n < 4 { "owo" } else { "OAO" };
  println!("{}", x);
  // OAO
}
Rust 中,若 else 沒有寫出來,視為回傳
(),以剛剛的例子而言,由於x必須在編譯時期就確定型態,所以 if/else 回傳的值必須一致。也因此,通常 if 會伴隨 else,除非 if 沒有回傳值fn main () { let n = 4; let x = if n < 4 { "owo" } else { 5 }; // expected `&str`, found integer println!("{}", x); }
fn main () {
    let n = 4;
    let x = if n < 4 { "owo" }; // expected `()`, found `&str`
}
fn main () {
    let n = 4;
    let x = if n < 5 { println!("OAO") };
    // OAO
}
loop,是一個不帶條件的無限迴圈
fn main () {
  loop {
      print!("喵喵喵喵");
  }
}
跟其他的程式語言一樣,Rust 有
continue與breakfn main () { loop { print!("汪汪"); break; } loop { print!("喵喵喵喵"); continue; print!("噗伊"); } }你可以在
break後面接值,這個值會被作為回傳值fn main () { let a = loop { println!("噗伊"); break 5; }; println!("{}", a); // 噗伊 // 5 }while,帶有條件的迴圈
fn main () {
  let mut n = 0;
  while n < 10 {
      println!("喵喵喵喵");
      n += 1;
  }
}
while 也可以接在等號後面,但因為
break在while中不能接值,所以永遠會回傳()fn main () { let mut n = 0; let x = while n < 10 { n += 1; break 5; // can only break with a value inside `loop` or breakable block }; }
fn main () {
    let mut n = 0;
    // OK,但 x = ()
    let x = while n < 10 {
        n += 1;
        break;
    };
}
- loop 與 while 的差異
- loop 是不帶條件一定會執行的迴圈
- while 是帶有條件,不一定會被執行的迴圈
- 對於編義器來說,while block 裡的程式碼不一定會被執行到,無論 while 後面接的是不是 true
- 也是因為這個差異,
break在while裏面才會不能接值,因為 while 沒有被執行的情況下,回傳直永遠是(),所以在 while block 裡的回傳值一定要是()fn main () { let x; loop { x = 1; break; } println!("{}", x); // x 一定會在 loop 中被初始化,所以編譯會過 }
fn main () {
    let x;
    while true { x = 1; break; }
    // 因為編譯器無法保證 while block 裡的程式碼一定會被執行到,所以無法保證 x 一定會被初始化,因此編譯不會過
    println!("{}", x); // use of possibly-uninitialized `x`
}
- for loop,Rust 中沒有其他語言常有的
for (i = 0;i < 10;i++),Rust 中的 for loop形式跟其他語言的 for-each 視同義的fn main () { let array = [1, 2, 3]; for i in array.iter() { println!("{}", i); } } for loop 跟 while 的特性一樣,block 中的
break後不可以接值, for loop 可以接在等號後面function
fn add (t: (i32, i32)) -> i32 {
  t.0 + t.1
}
function 的 parameter 還可以直接解構
fn add ((x, y): (i32, i32)) -> i32 {
  x + y
}
function 可以作為一個普通的變數
fn add ((x, y): (i32, i32)) -> i32 {
  x + y
}
fn main () {
  let func = add;
  println!("{}", func((1, 2))); // 3
}
不會正常回傳的 function
fn amazing () -> ! {
  panic!("crash the application~~");
}
const fn,加上 const 關鍵字的 function 可以在編譯時期被執行,執行完的值也可以作為常數使用 ```rust const fn add ((x, y): (i32, i32)) -> i32 { x + y }
fn main () { const CONSTANT: i32 = add((1, 2)); println!("{}", CONSTANT); }
- Rust 的 function 可以遞迴,但跟其他語言一樣過多層的遞迴會 stack overflow
---
# Rust 所有權系統
## 所有權的機制 (Ownership)
1. 所有的 Value 與 記憶體位置 只會有一個 變數 管理他們,意思是不會有兩個變數同時紀錄同一個記憶體位置
2. 所有的 Value 與 記憶體位置 都必須要有個一個 變數 管理他們,所以當變數因為生命周期結束時,代表Value會被銷毀、記憶體位置會被釋放
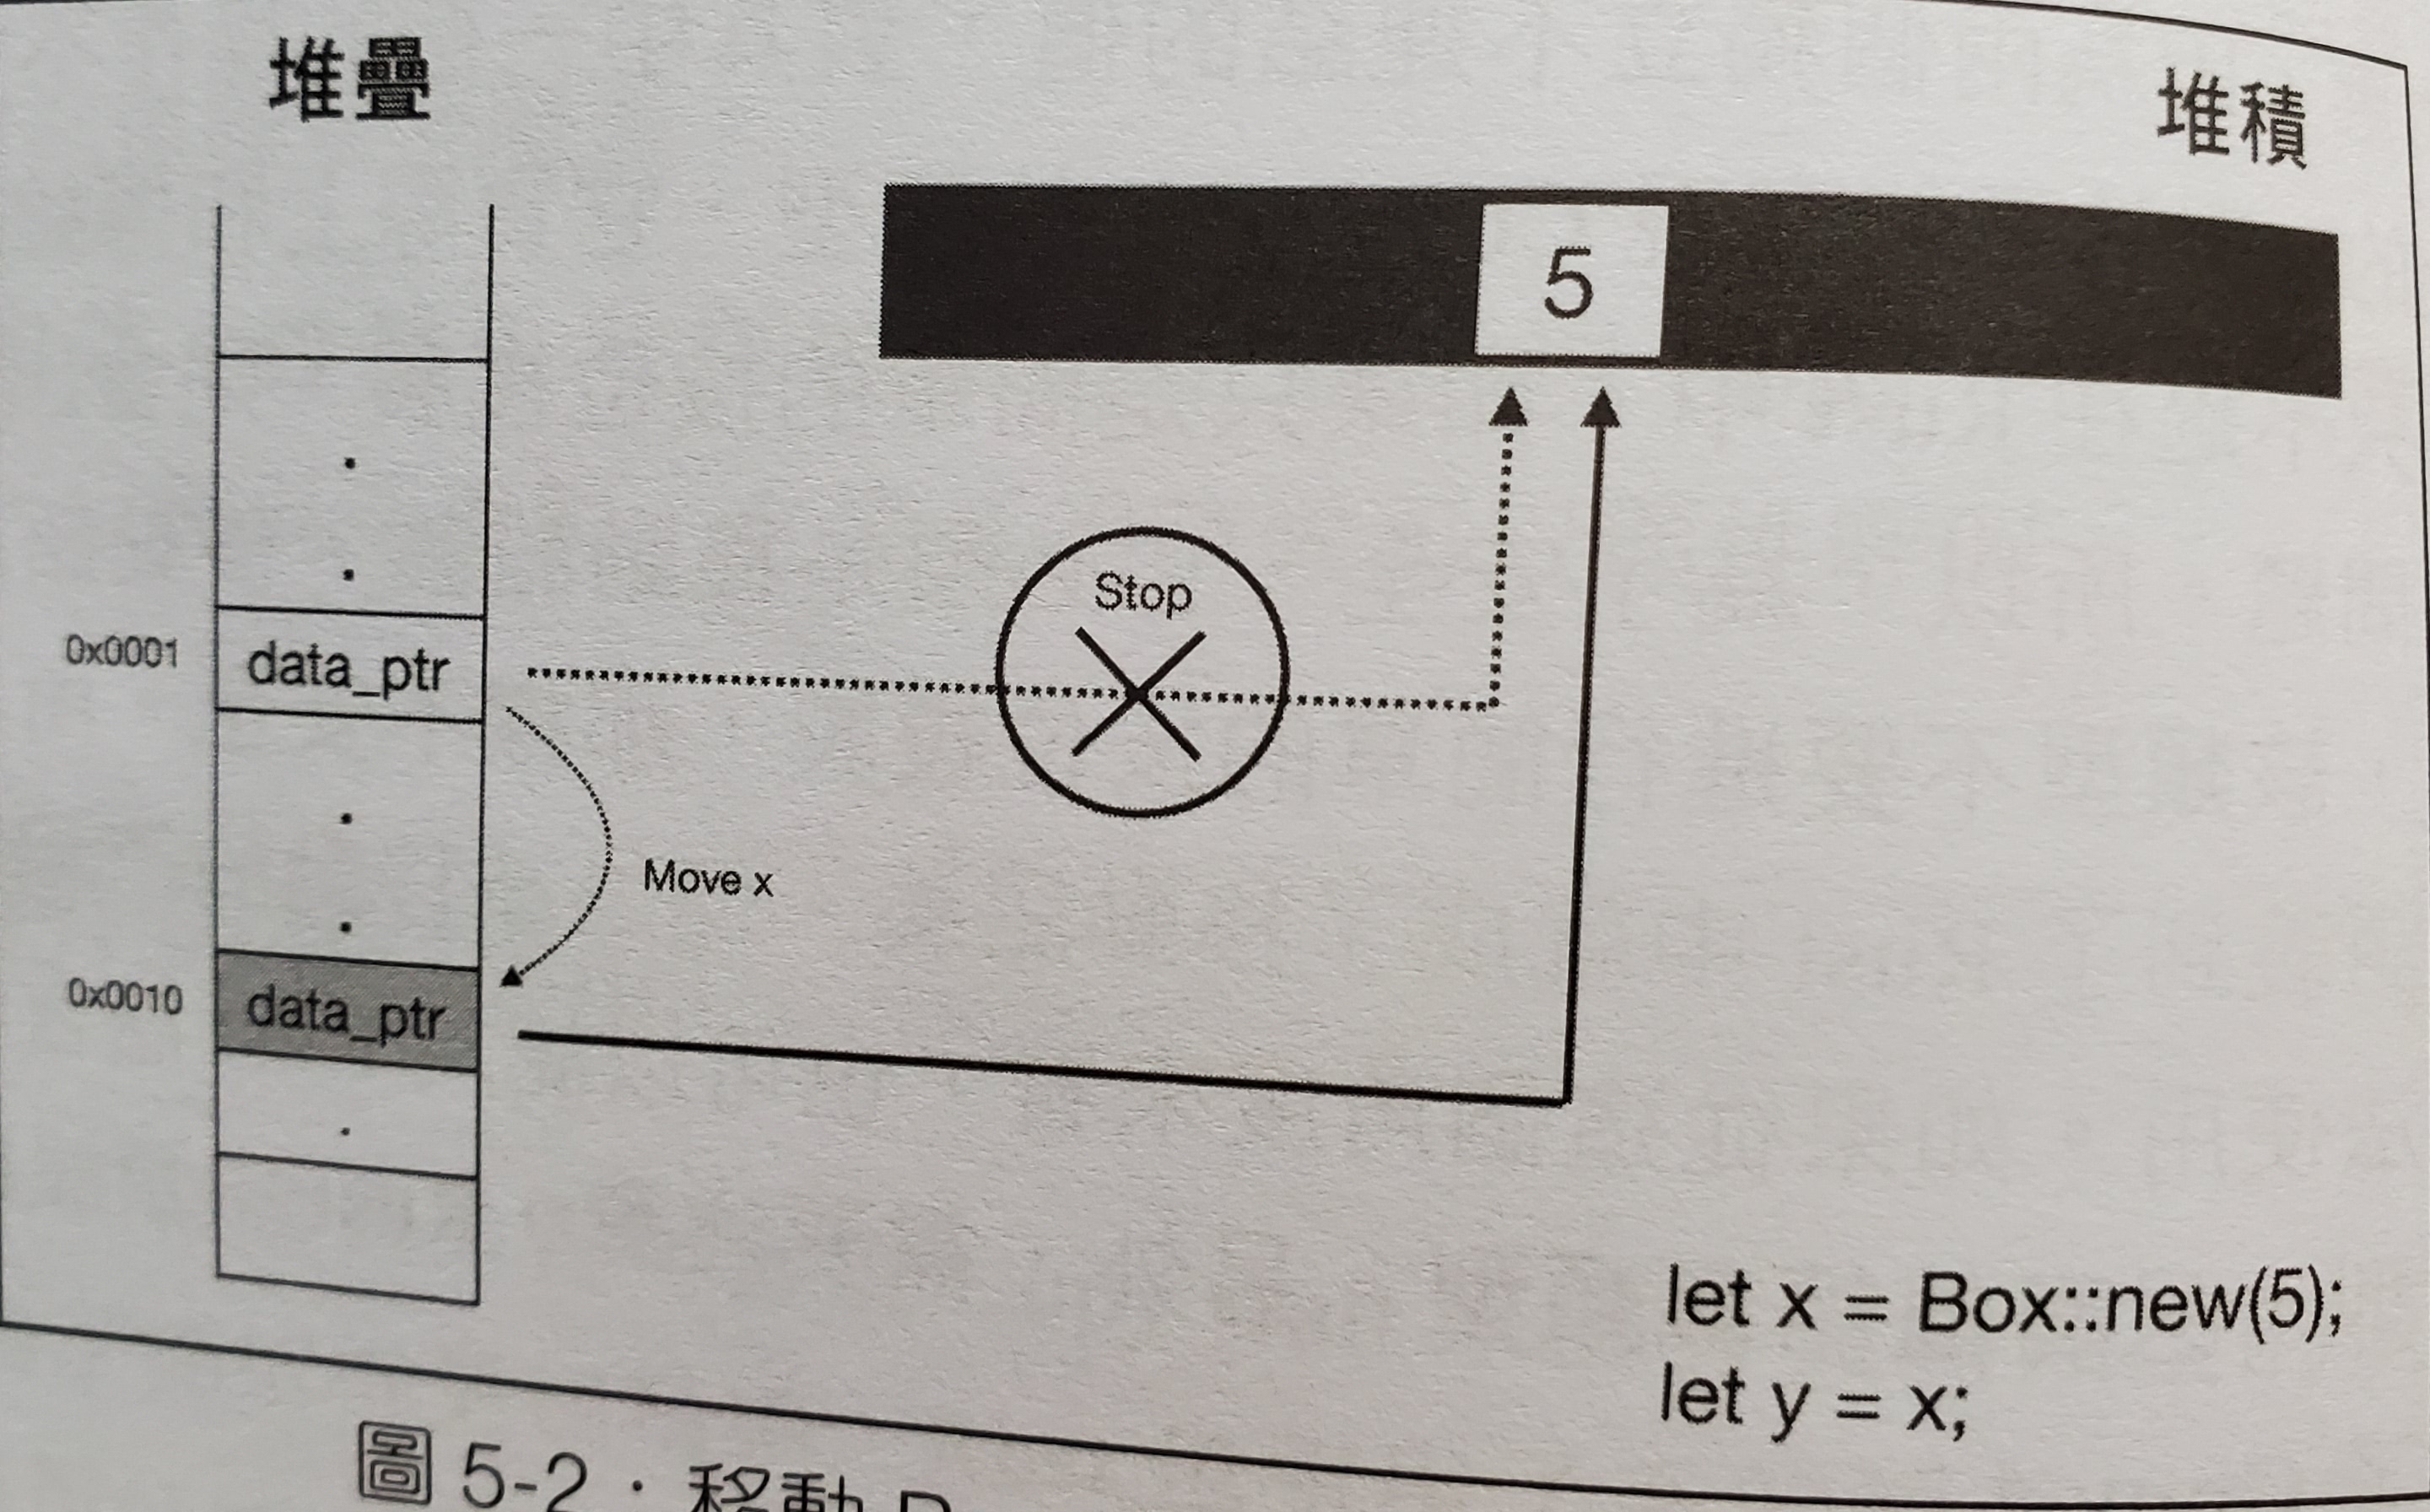
## 所有權轉移 (Move)
```rust
#[derive(Debug)]
struct Person {
age: i32
}
fn main () {
let x = Person { age: 16 };
let y = x;
// borrow of moved value: `x`
// 所有權被轉移了,所以你不能再使用 x
println!("{:?}", x);
println!("{:?}", y);
}
按位複製 (Copy)
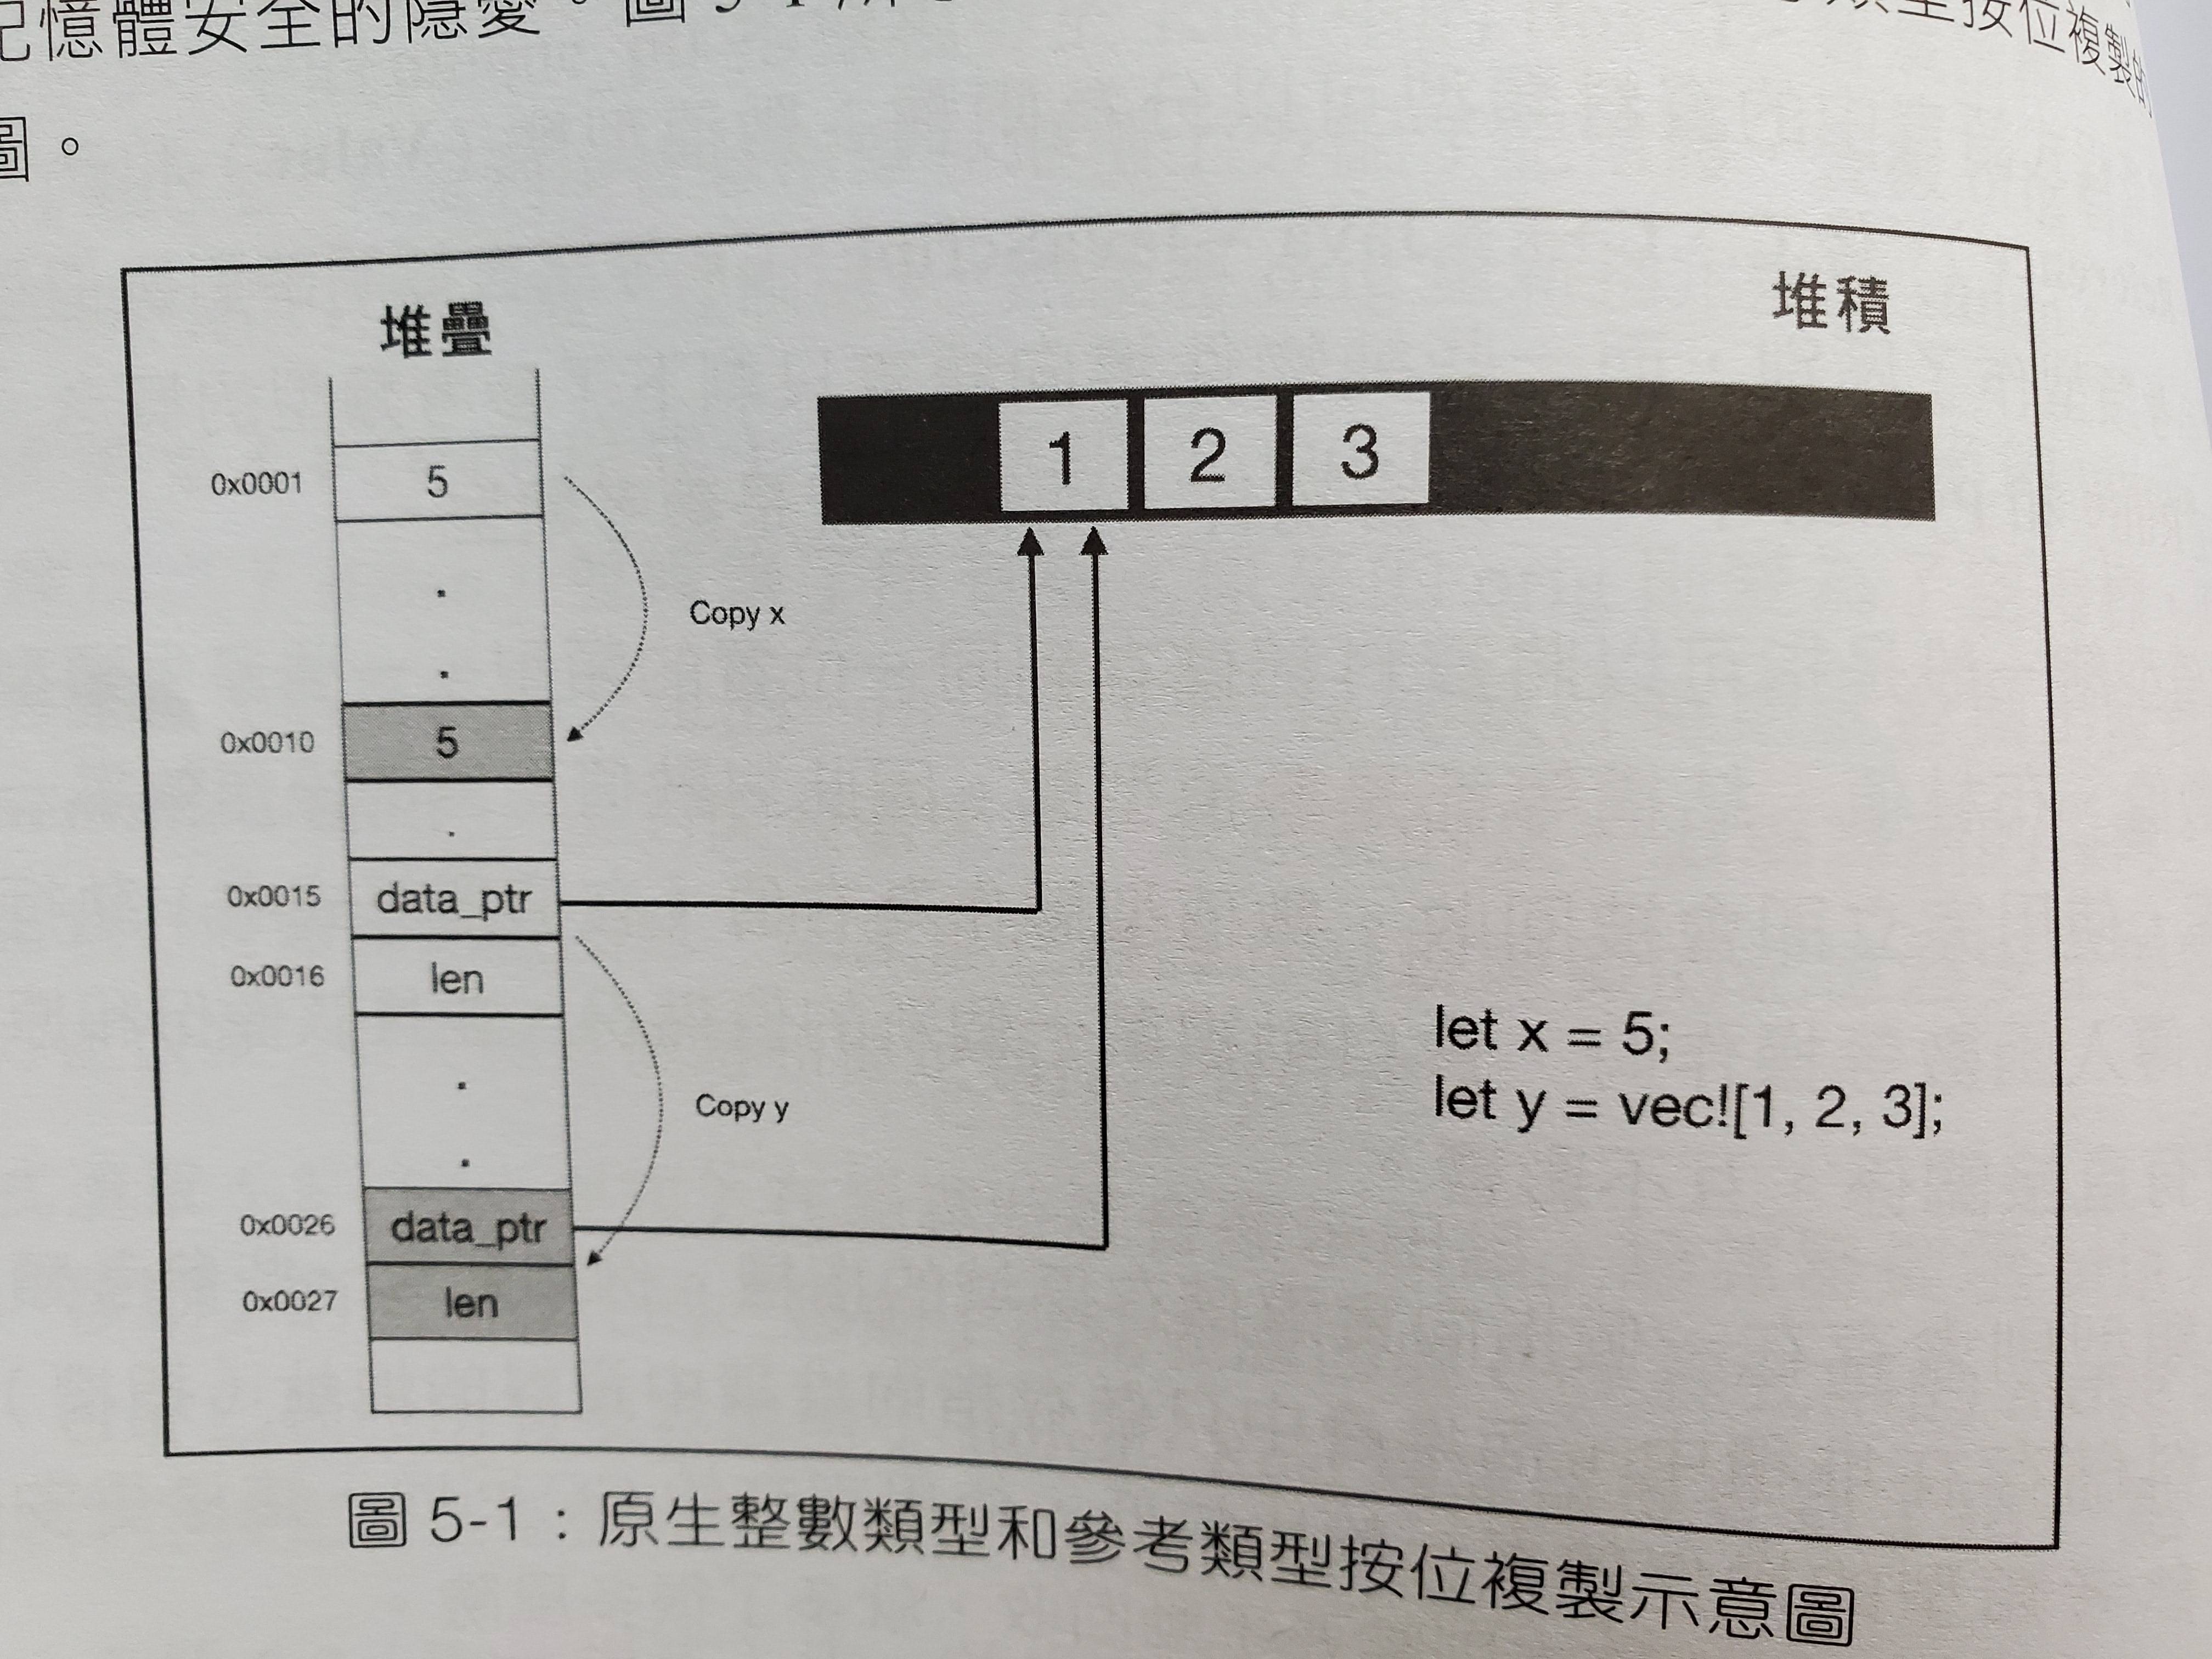
- 記憶體位置是不能被 Copy 的
- struct 在沒有實現 Copy 前,是不會進行 Copy,而會進行 Move
- 但 array、tuple、Option 本身就有實現 Copy,所以在所有的值都可以實現 Copy 的情況,會進行 Copy,如果有一個值不能實現 Copy 則會進行 Move
- 實現 Copy、Clone trait (因為 Copy 繼承 Clone,所以必須同時實現 Copy 與 Clone trait) (關於 trait 會在之後的章節提到)
#[derive(Debug)] struct Person { age: i32 } // Clone trait 用來實現 deep clone // 任何類型都可以實作 Clone impl Clone for Person { fn clone (&self) -> Person { Person { age: self.age } } } // Copy trait 像是一個標籤 // 他裏面沒有任何可以實現的 function // 但實作 Copy 的 struct 可以進行 Copy // 不過可以實作 Copy 的 struct,成員必須不包含指標類型 impl Copy for Person {} fn main () { let x = Person { age: 16 }; let y = x; println!("{:p}", &x); println!("{:?}", x); println!("{:p}", &y); println!("{:?}", y); } - 快速實現 Copy 與 Clone
#[derive(Debug, Copy, Clone)]
struct Person {
    age: i32
}
fn main () {
    let x = Person { age: 16 };
    let y = x;
    println!("{:p}", &x);
    println!("{:?}", x);
    println!("{:p}", &y);
    println!("{:?}", y);
}
所有權借用 (Borrow)
介紹
- 借用分成==不可變借用==(&)跟==可變借用==(&mut)
用 & 來借用
#[derive(Debug)]
struct Person {
  age: i32
}
fn birthday (y: &mut Person) {
  y.age = y.age + 1;
}
fn main () {
  let mut x = Person { age: 16 };
  birthday(&mut x);
  println!("{:?}", x);
}
沒有借用的情況,所有權會被轉移
#[derive(Debug)]
struct Person {
  age: i32
}
fn birthday (mut y: Person) {
  y.age = y.age + 1;
}
fn main () {
  let x = Person { age: 16 };
  birthday(x);
  println!("{:?}", x);
}
output
 |
9  |     let x = Person { age: 16 };
 |         - move occurs because `x` has type `Person`, which does not implement the `Copy` trait
10 |     birthday(x);
 |              - value moved here
11 |     println!("{:?}", x);
 |                      ^ value borrowed here after move
借用的規則 (Rust 核心原則之一:共享不可變,可變不共享)
在==不可變借用==期間 (共享),擁有者不能修改 Value,也不能進行==可變借用== (不可變),但可以再進行==不可變借用==
#[derive(Debug)]
struct Person {
  age: i32
}
#[allow(dead_code)]
fn birthday (y: &mut Person) {
  y.age = y.age + 1;
}
#[allow(unused_mut)]
fn main () {
  let mut x = Person { age: 16 };
  let y = &x; // 不可變借用,擁有者是 x,借用者是 y
  println!("{:p}", &x); // x 可以再進行不可變借用
  // cannot borrow `x` as mutable because it is also borrowed as immutable
  // 但不可以再進行可變借用
  birthday(&mut x);
  println!("{:?}", y); // 借用者 y 可以使用 x,印出值
}
在==可變借用==期間 (可變),擁有者不能存取 Value,也不能進行==不可變借用== (不共享)
#[derive(Debug)] struct Person { age: i32 } #[allow(dead_code)] fn birthday (y: &mut Person) { y.age = y.age + 1; } #[allow(unused_mut)] fn main () { let mut x = Person { age: 16 }; let y = &mut x; // 可變借用,擁有者是 x,借用者是 y y.age = 1; // cannot borrow `x` as immutable because it is also borrowed as mutable // x 不可以再進行不可變借用 println!("{:p}", &x); // cannot borrow `x` as mutable more than once at a time // 當然也不可以再進行可變借用 birthday(&mut x); // cannot use `x.age` because it was mutably borrowed // 同時你也不可以存取 x y.age = x.age + 1; println!("{:?}", y); // 借用者 y 可以使用 x,印出值 }- 借用者的==生命周期==不能夠長於擁有者
- 範例在==生命周期==的章節再寫
Rust 生命周期 (Lifetime)
介紹(幹話)
- ==變數== 從出生到死亡的時間段
fn main () {
    let x = Box::new(5); // x 出生
    println!("{:?}", x);
    {
        let y = Box::new(1); // y 出生
        println!("{:?}", y);
    } // y 死亡
    // cannot find value `y` in this scope
    // y 死掉了,所以你存取不到他
    println!("{:?}", y);
} // x 死亡
Borrow checker
- 編譯器的機制
- 會檢查借用者的生命周期會不會活的比擁有者久
- 為了避免 null pointer 發生,就是擁有者已經死了,Value 已經被銷毀了,但借用者還活著,就會存取到不存在的東西
#[allow(unused_variables, unused_assignments)]
fn main () {
    let x; // x 出生
    {
        let y = Box::new(1); // y 出生
        x = &y; // x 借用 y 的所有權
        println!("{:?}", y);
    } // y 死亡
    // `y` does not live long enough
    // y 死掉了,所以 x 存取不到他 (1編譯器:可憐的 y 他活的不夠久 owo)
    println!("{:?}", x);
} // x 死亡
生命周期標示
- 在名字前面加個
',就是生命周期的標示 - 以剛剛的例子來說 ```rust fn main () { test(); }
// 生命周期標示,必須像泛型一樣,在 function 簽名中先被宣告 fn test<'a, 'b> () { let x: &'a i32 = &5; // 'a 開始 println!("{:?}", x); { let y: &'b i32 = &2; // 'b 開始 println!("{:?}", y); } // 'b 結束 } // 'a 結束
- 不必要標生命周期的情況
```rust
#[derive(Debug)]
struct Person {
    age: i32
}
// 因為 傳入值 與 回傳值 只有一個
// 不會造成編譯器需要檢查生命周期的問題
// 所以沒有必要標示生命周期
fn life_again_gun (y: &mut Person) -> &mut Person {
    y.age = 0;
    y
}
fn main () {
    let mut x = Person { age: 16 };
    let y = life_again_gun(&mut x);
    println!("{:?}", y);
}
- 必須要標生命周期的情況
```rust
[derive(Debug)]
struct Person { age: i32 } // missing lifetime specifier // 因為編譯器看不出回傳的 借用者 是不是會超過 擁有者 的 lifetime // 所以要求你編上 lifetime fn the_older (x: &Person, y: &Person) -> &Person { if x.age > y.age { x } else { y } } fn main () {
}
```rust
#[derive(Debug)]
struct Person {
    age: i32
}
// 我們預期這裡只會有一種生命周期
fn the_older<'a> (x: &'a Person, y: &'a Person) -> &'a Person {
    if x.age > y.age { x } else { y }
}
fn main () {
    let x = Person { age: 16 };
    let y = Person { age: 17 };
    let res = the_older(&x, &y);
    println!("{:?}", res)
}
- 指定多個生命周期,並標示哪個生命周期比較長
#[derive(Debug)]
struct Person {
  age: i32
}
// 我們有兩個生命周期 'a 與 'b,其中 'b 活的比 'a 久
fn the_older<'a, 'b: 'a> (x: &'a Person, y: &'b Person) -> &'a Person {
  if x.age > y.age { x } else { y }
}
fn main () {
  let x = Person { age: 16 };
  let res;
  {
      let y = Person { age: 17 };
      res = the_older(&x, &y);
      println!("{:?}", res);
  }
}
NLL (Non-Lexical-Lifetime)
Lexical-Lifetime
- 是指說生命周期與變數的作用域是綁定在一起的
- 舉個例子
#[derive(Debug)]
struct Person {
  age: i32
}
fn birthday (y: &mut Person) {
  y.age = y.age + 1;
}
fn life_again_gun (y: &mut Person) -> &mut Person {
  y.age = 0;
  y
}
fn main () {
  let mut x = Person { age: 16 };
  let y = life_again_gun(&mut x);
  // 在 Lexical-Lifetime 的情況,y 的生命周期沒有結束
  // 所以 y 還在進行可變借用
  // 那理論上 x 就不可以再度可變出借
  // (NLL 好像已經是標準了,所以我無法實現 LL 的編譯錯誤)
  birthday(&mut x);
  println!("{:?}", x);
}
Non-Lexical-Lifetime
- borrow checker 的分析結構方式從 AST 轉向 MIR
- AST 是抽象語法樹,它會以樹狀的形式表現程式語言的語法結構,因為舊的 borrow checker 用 AST 做分析,所以會造成生命周期與作用域掛鉤
- MIR 是中間表達式,他在編譯器內部會有像是流程圖的資料結構,用流程控制的方式去分析生命周期
- 只要變數在後面的程式碼中,沒有機會被使用到,就會提早被結束生命周期
- NLL 將作用域與生命周期拆開來看了
- NLL 縮短了過長的生命周期 (縮減了變數的生命),讓程式不會充滿一堆 block 去迴避 LL 造成的問題
- 舉例來說
#[derive(Debug)]
struct Person {
  age: i32
}
fn birthday (y: &mut Person) {
  y.age = y.age + 1;
}
fn life_again_gun (y: &mut Person) -> &mut Person {
  y.age = 0;
  y
}
fn main () {
  let mut x = Person { age: 16 };
  let y = life_again_gun(&mut x);
  // 在 Non-Lexical-Lifetime 的情況
  // y 在這段程式碼的後面都沒有被使用到
  // y 的生命周期就結束了
  // 那這裡就不會有問題
  birthday(&mut x);
  println!("{:?}", x);
}
#[derive(Debug)]
struct Person {
    age: i32
}
fn birthday (y: &mut Person) {
    y.age = y.age + 1;
}
fn life_again_gun (y: &mut Person) -> &mut Person {
    y.age = 0;
    y
}
fn main () {
    let mut x = Person { age: 16 };
    let y = life_again_gun(&mut x);
    // cannot borrow `x` as mutable more than once at a time
    // 但如果 y 在後面有機會被使用到
    // 就代表 y 的生命周期還沒有結束
    // 所以 x 不可以再度進行可變出借
    birthday(&mut x);
    y.age = 16;
    println!("{:?}", x);
}
Rust 型別系統
[TOC]
型別大小
- Sized Tyep
- 大部分的類型都是 Sized Type,就是可以在編譯時期就知道大小的
- 例如:u32, i64
- Dynamic Sized Type
- 無法在編譯時期知道大小的型別則叫作「DST (Dynamic Sized Type)」
- 例如:[T], Box

Zero Sized Type
- 另外還有一種類型叫「ZST (Zero Sized Type)」,在執行時期,不佔用空間大小的型別
你可以用 ZST 來做一些反覆運算,Rust 編譯器有對 ZST 做最佳化
fn main() {
let v: Vec<()> = vec![(); 10];
// 像是你可以這樣寫
for _i in v {
  println!("{:?}", 1);
}

// 雖然你有更簡單的寫法
for _i in 1..10 {
  println!("{:?}", 1);
}
}
Bottom Type
- 只的是 never 類型
- 程式碼中用
!表示 - 特點
- 沒有值
- 是任意類型的子類型
- Bottom Type 的用處
- Diverging Function (發散函數)
- loop 迴圈
- 空列舉
enum Void{}
- ex: ```rust fn print_meow_forever () -> ! { loop { println!("meow"); } }
fn main () { let i = if false { print_meow_forever(); } else { 100 }; println!("{}", i); }
- `turbofish` 運算子
    - 用來做顯示的型別宣告
    ex:
```rust
fn main () {
    let x = "1";
    println!("{}", x.parse::<i32>().unwrap());
}
泛型
- 用這樣的語法
<T>宣告泛型 ex:struct Point<T> { x: T, y: T }
trait 用法
宣告 interface
- interface 裡可以定義 function 或 type
- interface 裡不能實作另一個 interface,但 interface 之間可以繼承
- 使用
impl實作 interface - 使用
trait宣告 interface - 孤兒原則 (Orphan Rule)
- 要實現某個 trait,這個 trait 必須要在當前的 crate 中被定義
- 用來避免標準函式庫,或在其他地方被定義好的 trait 被修改到,而難以追查
實作自己的 Add:
trait Add<RHS, Output> {
    fn my_add (self, rhs: RHS) -> Output;
}

impl Add<i32, i32> for i32 {
    fn my_add (self, rhs: i32) -> i32 {
        self + rhs
    }
}

impl Add<u32, i32> for u32 {
    fn my_add (self, rhs: u32) -> i32 {
        (self + rhs) as i32
    }
}

fn main () {
    let (a, b, c, d) = (1i32, 2i32, 3u32, 4u32);
    let x: i32 = a.my_add(b);
    let y: i32 = c.my_add(d);
    println!("{}", x);
    println!("{}", y);
}
標準函式庫裡的 Add trait
pub trait Add<RHS = Self> {
    type Output;
    fn add (self, rhs: RHS) -> Self::Output;
}
標準函式庫 u32 的加法實作
impl Add for u32 {
    type Output = u32;
    fn add (self, rhs: u32) -> u32 { self + rhs }
}
標準函式庫 String 的加法實作
impl Add for String {
    type Output = String;
    fn add (mut self, rhs: &str) -> String {
        self.push_str(rhs);
        self
    }
}
trait 裡的 function 可以有一個 default 的實作
trait Top {
    fn wear_top (&mut self, _clothes: String) {
        println!("Default: coat");
    }
}

trait Bottom {
    fn wear_bottom (&mut self, _clothes: String) {
        println!("Default: pants");
    }
}

struct PersonLikeCoat {
    top: String,
    bottom: String,
}

impl Top for PersonLikeCoat {}

impl Bottom for PersonLikeCoat {
    fn wear_bottom (&mut self, clothes: String) {
        self.bottom = clothes;
        println!("Changed: {}", self.bottom);
    }
}

fn main () {
    let mut ballfish = PersonLikeCoat { top: String::from("coat"), bottom: String::from("pants") };
    ballfish.wear_top(String::from("sweater"));
    ballfish.wear_bottom(String::from("skirt"));
}
trait 的繼承
trait Top {
    fn wear_top (&mut self, _clothes: String) {
        println!("Default: coat");
    }
}

trait Bottom {
    fn wear_bottom (&mut self, _clothes: String) {
        println!("Default: pants");
    }
}

struct Person {
    top: String,
    bottom: String,
}

impl Top for Person {}

impl Bottom for Person {
    fn wear_bottom (&mut self, clothes: String) {
        self.bottom = clothes;
        println!("Changed: {}", self.bottom);
    }
}

trait WholeBody: Top + Bottom {
    fn wear_whole_body (&mut self, top: String, bottom: String) {
        self.wear_top(top);
        self.wear_bottom(bottom);
    }
}

impl WholeBody for Person {}

fn main () {
    let mut ballfish = Person { top: String::from("coat"), bottom: String::from("pants") };
    ballfish.wear_whole_body(String::from("sweater"), String::from("skirt"));
}
用 trait 對泛型做限定 (trait Bound)

語法 fn generic<T: FirstTrait + SecondTrait>(t: T) {}
或 fn generice<T> (t: T) where T: FirstTrait + SecondTrait {}
ex:
trait Top {
    fn wear_top (&mut self, _clothes: String) {
        println!("Default: coat");
    }
}

trait Bottom {
    fn wear_bottom (&mut self, _clothes: String) {
        println!("Default: pants");
    }
}

struct Person {
    top: String,
    bottom: String,
}

impl Top for Person {}

impl Bottom for Person {
    fn wear_bottom (&mut self, clothes: String) {
        self.bottom = clothes;
        println!("Changed: {}", self.bottom);
    }
}

fn go_routin1<P: Top + Bottom> (p: &mut P) {
    p.wear_top(String::from("sweater"));
    p.wear_bottom(String::from("skirt"));
}

fn go_routin2<P> (p: &mut P) where P: Top + Bottom {
    p.wear_top(String::from("sweater"));
    p.wear_bottom(String::from("skirt"));
}

fn main () {
    let mut ballfish = Person { top: String::from("coat"), bottom: String::from("pants") };
    go_routin1::<Person>(&mut ballfish); // ::<Person> 可省
    go_routin2::<Person>(&mut ballfish); // ::<Person> 可省
}
宣告抽象型別 (Abstract Type)
- Abstract Type 是無法產生實體的型別
- rust 有兩種方式處理抽象型別:trait Object、impl Trait
- trait Object
- 將 trait 當作一種型別使用
- 與 trait bound 有點像,但 trait bound 是靜態分配,而 trait Object 是動態分配
- trait Object 在編譯時期無法知道其記憶體大小,所以他本身是一種指標
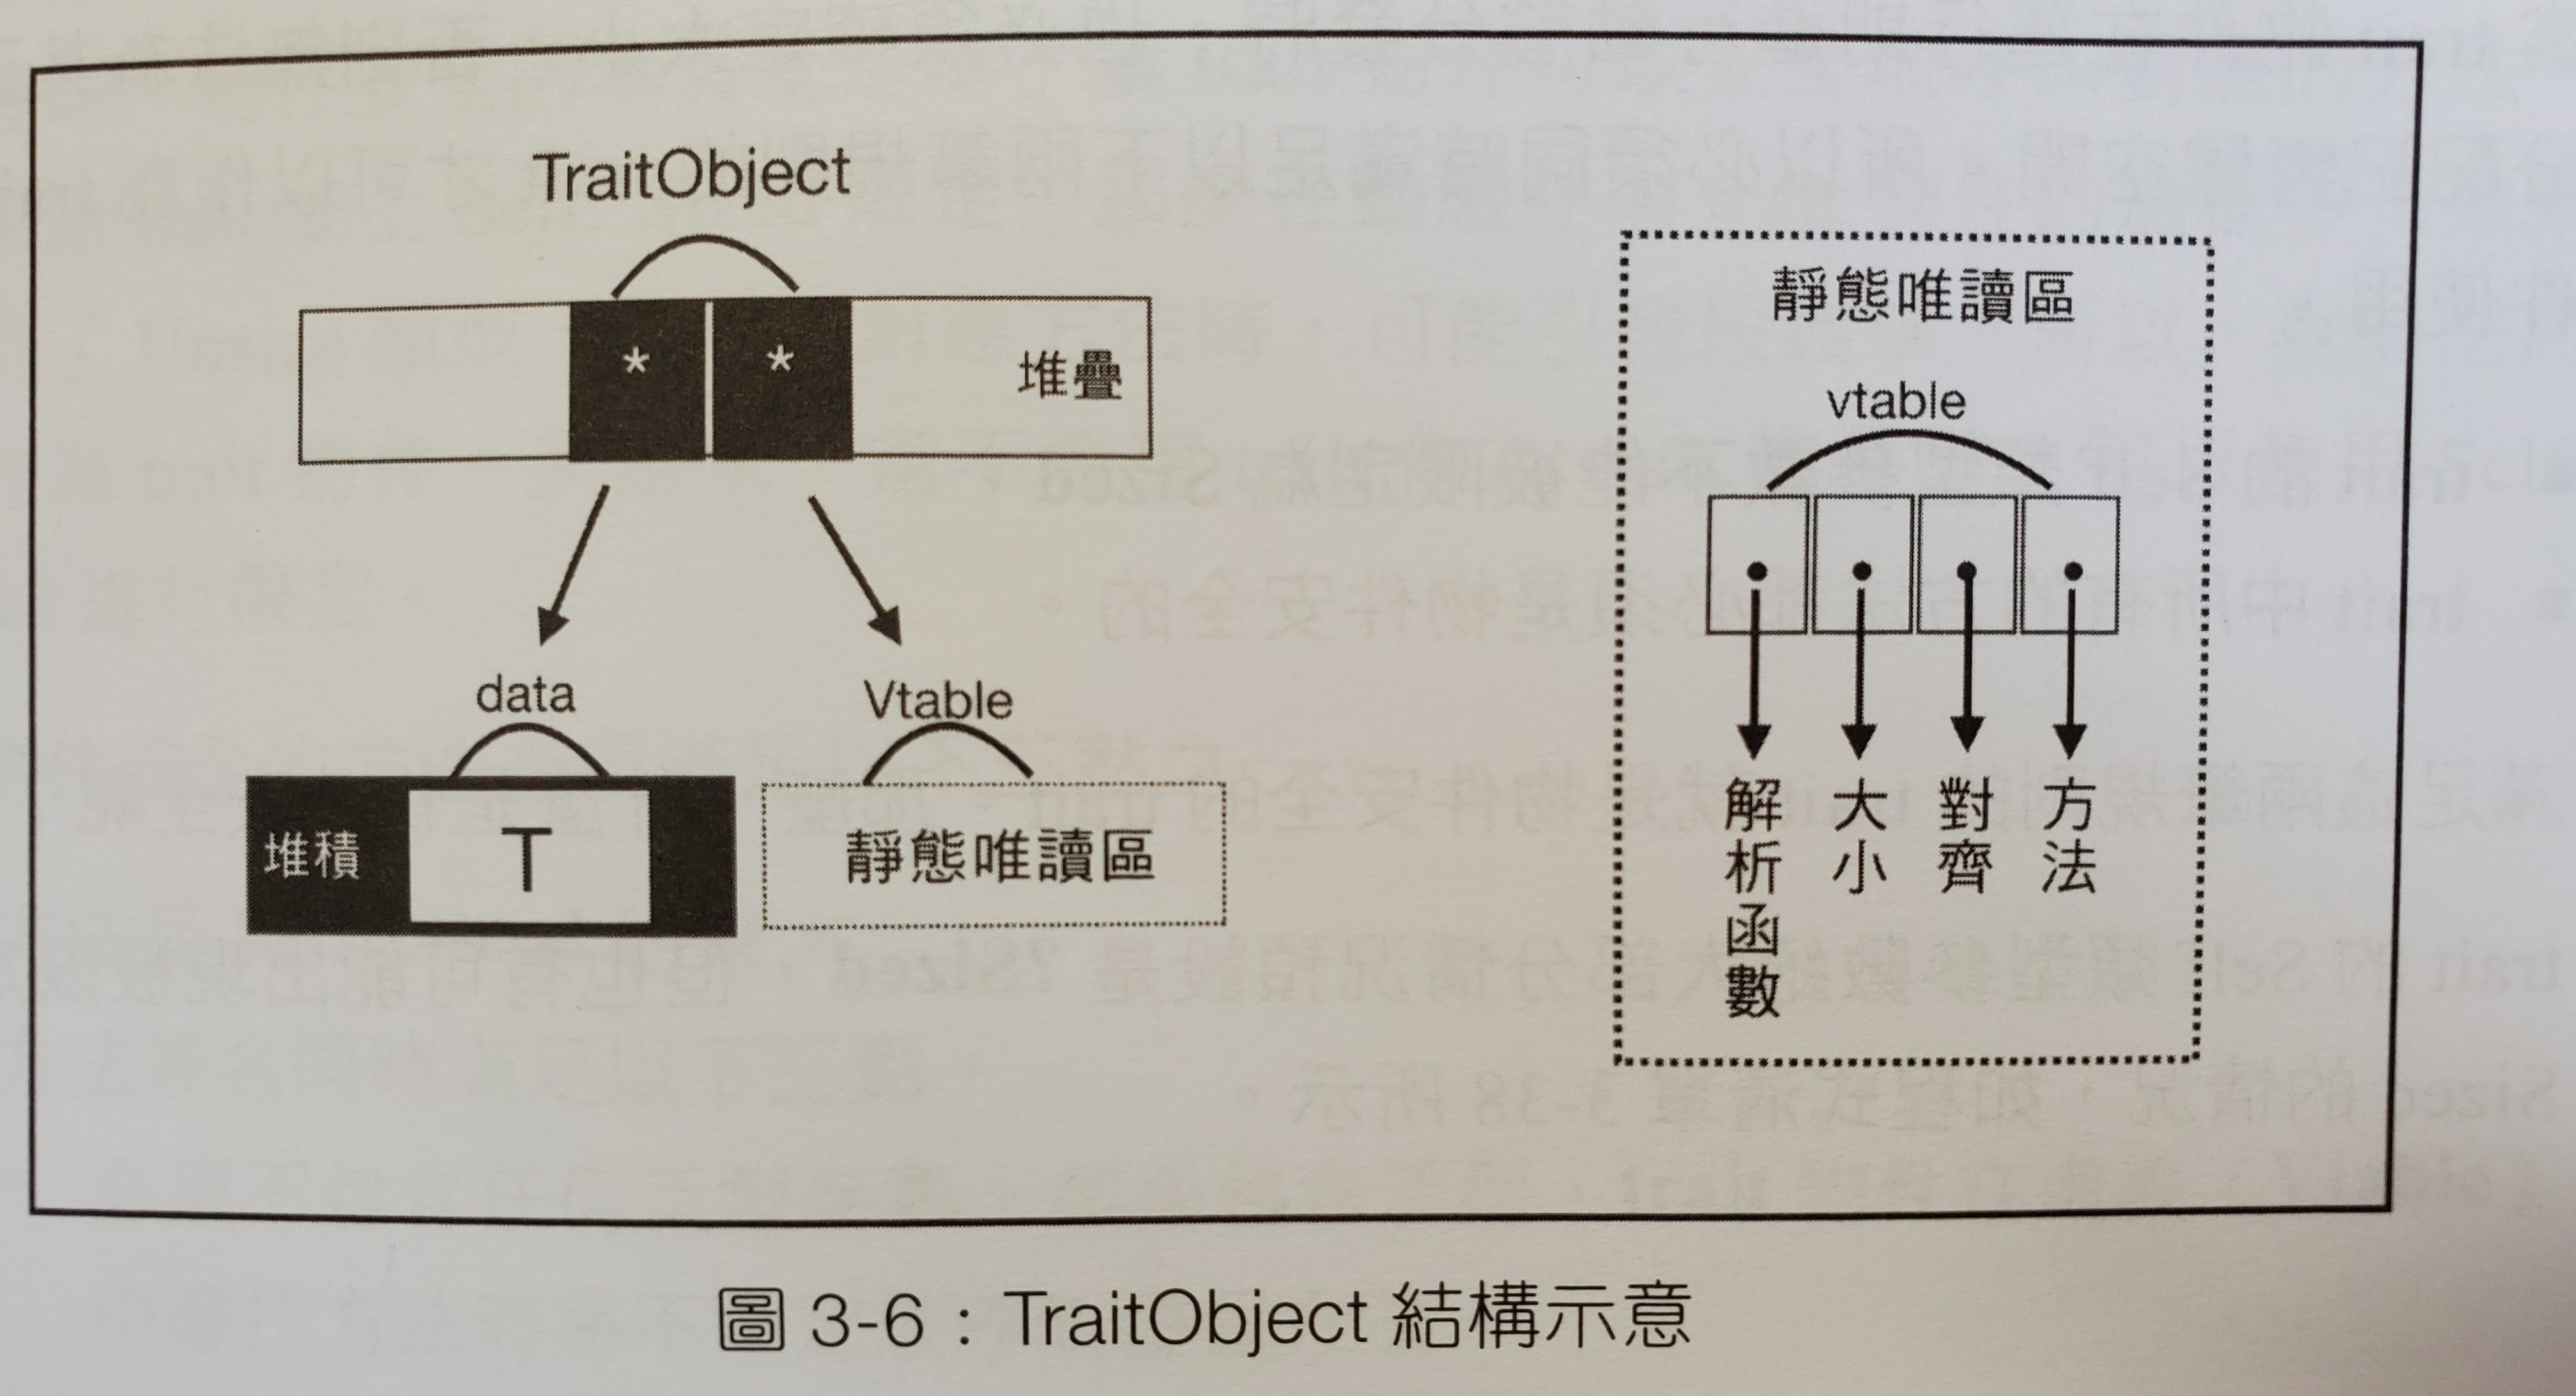
pub struct TraitObject {
    pub data: *mut (),
    pub vtable: *mut (),
}
- 上面的 struct 來自標準函式庫,但不是真的 trait 物件
- data指標指向trait物件儲存的類型資料T
- vtable指標指向包含為T實作的virtual table (虛表)
- 虛表本身是一種struct,包含解構函數、大小、方法等
- 編譯器只知道trait object的指標,但不知道要呼叫哪個方法
- 運行期, 會從虛表中查出正確的指標• 再進行動態呼叫
Trait物件的限制
- Trait的Self有一個隱式的trait bound
?Sized如<Self: ?Sized>,包含所有可確定大小的類型,也就是<T: Sized> - 但trait物件的Self不能被限定是Sized,因為trait物件一定是動態分配,所以不可能滿足Sized的條件
- 但Trait物件在運行期進行動態分發時必須確定大小,否則無法為其正確分配記憶體空間
因此trait中的方法必定是物件安全,物件安全即為必受到
Self: Sized的約束,且為沒有額外Self類型參數的非泛型方法// 物件不安全的 trait trait Foo { fn bad<T> (&self, x: T); fn new() -> Self; } // 方法一:將不安全的部份拆出去 trait Bar { fn bad<T> (&self, x: T); } trait Foo: Bar { fn new() -> Self; } // 方法二:使用 where trait Foo { fn bad<T>(&self, x: T); fn new() -> Self where self: Sized; // 但這個 trait 作為物件時, new 會無法被呼叫 }
- Trait的Self有一個隱式的trait bound
動態分配與靜態分配的比較
trait Top {
    fn wear_top (&mut self, _clothes: String) {
        println!("Default: coat");
    }
}

trait Bottom {
    fn wear_bottom (&mut self, _clothes: String) {
        println!("Default: pants");
    }
}

struct Person {
    top: String,
    bottom: String,
}

impl Top for Person {}

impl Bottom for Person {
    fn wear_bottom (&mut self, clothes: String) {
        self.bottom = clothes;
        println!("Changed: {}", self.bottom);
    }
}

trait WholeBody: Top + Bottom {
    fn wear_whole_body (&mut self, top: String, bottom: String) {
        self.wear_top(top);
        self.wear_bottom(bottom);
    }
}

impl WholeBody for Person {}

fn static_dispatch<P: WholeBody> (p: &mut P) {
    p.wear_top(String::from("sweater"));
    p.wear_bottom(String::from("skirt"));
}

fn dynamic_dispatch (p: &mut WholeBody) {
    p.wear_top(String::from("sweater"));
    p.wear_bottom(String::from("skirt"));
}

fn main () {
    let mut ballfish = Person { top: String::from("coat"), bottom: String::from("pants") };
    static_dispatch::<Person>(&mut ballfish); // ::<Person> 可省
    dynamic_dispatch(&mut ballfish);
}
impl Trait
- 是靜態分配的抽象類型
trait Fly {
    fn fly(&self) -> bool;
}

struct Duck;

impl Fly for Duck {
    fn fly(&self) -> bool {
        return true;
    }
}

fn fly_static (s: impl Fly) -> bool {
    s.fly()
}

fn can_fly (s: impl Fly) -> impl Fly {
    if s.fly() {
        println!("fly!");
    } else {
        println!("fell!")
    }
    s // return s
}

fn main () {
    let duck = can_fly(Duck);
}
- 雖然這個語法很有趣,但有些情況編譯器會誤判,例如下面的例子,
a跟b,被編譯器認定為不同的 type,所以sum會報錯
use std::ops::Add;
fn sum<T>(a: impl Add<Output=T>, b: impl Add<Output=T>) -> T {
    a + b
}
- 與靜態分配型態相對的是
dyn Trait動態分配的型態
fn dyn_can_fly (s: impl Fly+'static) -> Box<dyn Fly> {
    if s.fly() {
        println!("fly!");
    } else {
        println!("fell!");
    }
    Box::new(s)
}
標籖
- Rust一共提供5個常用的標籖• 被定義在
std::marker裡eSized用來標識編譯期可確定大小的類型,大部份類型都預設定義實作 SizedUnsize用來標識動態大小類型Copy用來標識可安全按位複製類型Send用來標識可跨執行緒安全傳遞值的類型,也就是可以跨執行緒傳遞所有權Sync用來標識可在執行緒間安全共用參考的類型
- 標籤類 trait,都是用下面這種寫法標示他的標籤性質
#[lang = "sized"] // lang 表示 Sized trait 供 Rust 語言本身使用
pub trait Sized {} // 此程式為空,無實作方法
類型轉換
Deref
- 參考使用
& - 設定值使用
* - 可以實作Deref的trait來自訂設定值的操作
- Deref是強制轉型的,如果某個類型
T實作Deref<Target=U>,則使用T的參考時,參考會被轉型成U
fn foo (s: &[i32]) {
    println!("{:?}", s[0]);
}

fn main () {
    let a = "hello".to_string();
    let b = " world".to_string();
    // b 被自動 deref
    let c = a + &b;
    println!("{:?}", c);

    /// &Vec<T> -> &[T]
    let v = vec![1, 2, 3];
    foo(&v);

    let x = Rc::new("hello");
    let y = x.clone(); // Rc<&str>
    // 如果想要呼叫 &str 的 clone,必須要自己 deref
    let z = (*x).clone(); // &str
}
as 運算符號
類型轉換(含生命週期)
fn main () {
    let a = 1u32;
    let b = a as u64;
    println!("{:?}", a);
    println!("{:?}", b);
    let c = std::u32::MAX;
    let d = c as u16;
    println!("{:?}", c);
    println!("{:?}", d);
    let e = -1i32;
    let f = e as u32;
    println!("{:?}", e);
    println!("{:?}", f);
    let a: &'static str = "hello"; // &'static str
    let b: &str = a as &str;
    let c: &'static str = b as &'static str;
}
限定用法
struct S(i32);
trait A {
    fn test(&self, i: i32);
}

trait B {
    fn test(&self, i: i32);
}

impl A for S {
    fn test(&self, i: i32) {
        println!("From A: {:?}", i);
    }
}

impl B for S {
    fn test(&self, i: i32) {
        println!("From B: {:?}", i)
    }
}

fn main () {
    let s = S(1);
    A::test(&s, 2);
    B::test(&s, 3);
    <S as A>::test(&s, 4);
    <S as B>::test(&s, 5);
}
From與Into
- 定義於
std::convert - 互為反向操作
#[derive(Debug)]
struct Person { name: String }
impl Person {
    fn new<T: Into<String>>(name: T) -> Person {
        Person { name: name.into() }
    }
}

fn main () {
    let person = Person::new("Alex");
    let person = Person::new("Alex".to_string());
    println!("{:?}", person);

    // String from 的方法
    let to_string = "hello".to_string();
    let from_string = String::from("hello");
    assert_eq!(to_string, from_string);

    // 如果 U 實現了 From<T>,則 T 類型的實例,都可以呼叫 into 方法轉換為 U
    let a = "hello";
    let b: String = a.into();
    // 所以一般情況只要實作 From 即可,除非 From 很難實作,才需要實作 Into
}
Trait系統的不足
孤兒原則
- 孤兒原則解說
- 若下游程式想要使用擴充某些 crate,就必須包裝成新的 type,以迴避孤兒原則
- 而對一些本地端的類型,在被 Option,或是 Rc 等 interface 包裝後,就會被認定為非本地端類型,擴充時就會發生問題
use std::ops::Add;
#[derive(PartialEq)]
struct Int(i32);
impl Add<i32> for Int {
    type Output = i32;
    fn add (self, other: i32) -> Self::Output {
        (self.0) + other
    }
}

impl Add<i32> for Option<Int> {} // (X)

// 因為 Rust 裡 Box 有 #[fundamental] 標籤
impl Add<i32> for Box<Int> {
    type Output = i32;
    fn add (self, other: i32) -> Self::Output {
        (self.0) + other
    }
}

fn main () {
    assert_eq!(Int(3) + 3, 6);
    assert_eq!(Box::new(Int(3)) + 3, 6);
}
程式複用率不高
重複原則
規定不可以為重疊的類型實作同一個 trait
impl<T> AnyTrait for T {}
impl<T> AnyTrait for T where T: Copy {}
impl<T> AnyTrait for i32 {}
//  效能問題
// 這裡實作了 += 的對應方法
impl<R, T: Add<R> + Clone> AddAssign<R> for T {
    fn add_assign(&mut self, rhs: R) {
        // clone 會造成效能的負擔,有些類型不需要用 clone 這個方法
        // 但因為重複原則,無法限縮實作對象,所以為了效能,很多作法是位每個類型實作 trait
        // 造成程式複用度不高
        let tmp = self.clone() + rhs;
        *self = tmp;
    }
}