(本地、可通信的、前臺、遠程)Service使用全面介紹
前言
如果你對Service還未了解,建議先閱讀我寫的文章:
Android四大組件:Service史上最全面解析
目錄
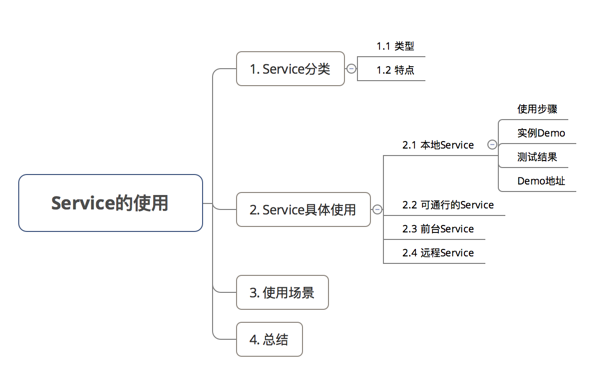
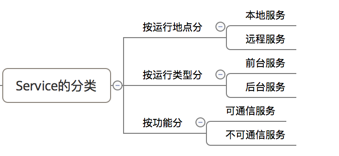
1. Service分類
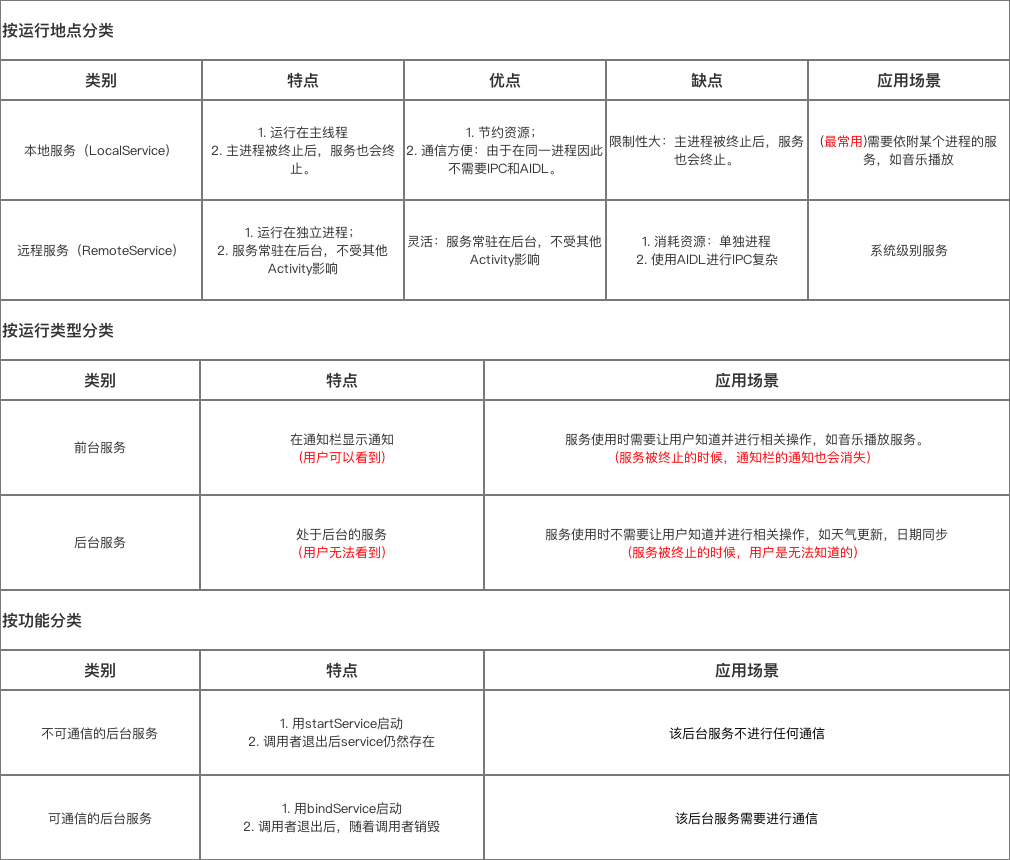
1.1 Service的類型
1.2 特點
2.具體使用解析
2.1 本地Service
這是最普通、最常用的後臺服務Service。
2.1.1 使用步驟
- 步驟1:新建子類繼承Service類
需重寫父類的onCreate()、onStartCommand()、onDestroy()和onBind()方法
- 步驟2:構建用於啟動Service的Intent對象
- 步驟3:調用startService()啟動Service、調用stopService()停止服務
- 步驟4:在AndroidManifest.xml裡註冊Service
2.1.2 實例Demo
接下來我將用一個實例Demo進行本地Service說明
建議先下載Demo再進行閱讀:(carson.ho的Github地址)Demo_for_Service
- 步驟1:新建子類繼承Service類
需重寫父類的onCreate()、onStartCommand()、onDestroy()和onBind()
MyService.java
public class MyService extends Service {


//啟動Service之後,就可以在onCreate()或onStartCommand()方法裡去執行一些具體的邏輯
//由於這裡作Demo用,所以只打印一些語句
    @Override
    public void onCreate() {
        super.onCreate();
        System.out.println("執行了onCreat()");
    }

    @Override
    public int onStartCommand(Intent intent, int flags, int startId) {
        System.out.println("執行了onStartCommand()");
        return super.onStartCommand(intent, flags, startId);


    }

    @Override
    public void onDestroy() {
        super.onDestroy();
        System.out.println("執行了onDestory()");
    }

    @Nullable
    @Override
    public IBinder onBind(Intent intent) {
        return null;
    }
}- 步驟2:在主佈局文件設置兩個Button分別用於啟動和停止Service
activity_main.xml
<?xml version="1.0" encoding="utf-8"?>
<RelativeLayout xmlns:android="http://schemas.android.com/apk/res/android"
    xmlns:tools="http://schemas.android.com/tools"
    android:layout_width="match_parent"
    android:layout_height="match_parent"
    android:paddingBottom="@dimen/activity_vertical_margin"
    android:paddingLeft="@dimen/activity_horizontal_margin"
    android:paddingRight="@dimen/activity_horizontal_margin"
    android:paddingTop="@dimen/activity_vertical_margin"
    tools:context="scut.carson_ho.demo_service.MainActivity">

    <Button
        android:layout_centerInParent="true"
        android:id="@+id/startService"
        android:layout_width="wrap_content"
        android:layout_height="wrap_content"
        android:text="啟動服務" />

    <Button
        android:layout_centerInParent="true"
        android:layout_below="@+id/startService"
        android:id="@+id/stopService"
        android:layout_width="wrap_content"
        android:layout_height="wrap_content"
        android:text="停止服務" />
</RelativeLayout>- 步驟3:構建Intent對象,並調用startService()啟動Service、stopService停止服務
MainActivity.java
public class MainActivity extends AppCompatActivity implements View.OnClickListener {

    private Button startService;
    private Button stopService;

    @Override
    protected void onCreate(Bundle savedInstanceState) {
        super.onCreate(savedInstanceState);
        setContentView(R.layout.activity_main);

        startService = (Button) findViewById(R.id.startService);
        stopService = (Button) findViewById(R.id.stopService);

        startService.setOnClickListener(this);
        startService.setOnClickListener(this);
    }

    @Override
    public void onClick(View v) {
        switch (v.getId()) {

            //點擊啟動Service Button
            case R.id.startService:
                //構建啟動服務的Intent對象
                Intent startIntent = new Intent(this, MyService.class);
                //調用startService()方法-傳入Intent對象,以此啟動服務
                startService(startIntent);

            //點擊停止Service Button
            case R.id.stopService:
                //構建停止服務的Intent對象
                Intent stopIntent = new Intent(this, MyService.class);
                //調用stopService()方法-傳入Intent對象,以此停止服務
                stopService(stopIntent);

        }
    }
}- 步驟4:在AndroidManifest.xml裡註冊Service
AndroidManifest.xml
<?xml version="1.0" encoding="utf-8"?>
<manifest xmlns:android="http://schemas.android.com/apk/res/android"
    package="scut.carson_ho.demo_service">

    <application
        android:allowBackup="true"
        android:icon="@mipmap/ic_launcher"
        android:label="@string/app_name"
        android:supportsRtl="true"
        android:theme="@style/AppTheme">
        <activity android:name=".MainActivity">

            <intent-filter>
                <action android:name="android.intent.action.MAIN" />
                <category android:name="android.intent.category.LAUNCHER" />
            </intent-filter>

        </activity>

        //註冊Service服務
        <service android:name=".MyService">
        </service>

    </application>

</manifest>
Androidmanifest裡Service的常見屬性說明
| 屬性 | 說明 | 備註 |
|---|---|---|
| android:name | Service的類名 | |
| android:label | Service的名字 | 若不設置,默認為Service類名 |
| android:icon | Service的圖標 | |
| android:permission | 申明此Service的權限 | 有提供了該權限的應用才能控制或連接此服務 |
| android:process | 表示該服務是否在另一個進程中運行(遠程服務) | 不設置默認為本地服務;remote則設置成遠程服務 |
| android:enabled | 系統默認啟動 | true:Service 將會默認被系統啟動;不設置則默認為false |
| android:exported | 該服務是否能夠被其他應用程序所控制或連接 | 不設置默認此項為 false |
2.1.3 測試結果

2.1.4 Demo地址
Carson.ho的Github地址:Demo_for_Service
2.2 可通信的服務Service
- 上面介紹的Service是最基礎的,但只能單機使用,即無法與Activity通信
- 接下來將在上面的基礎用法上,增設“與Activity通信”的功能,即使用綁定Service服務(Binder類、bindService()、onBind()、unbindService()、onUnbind())
2.2.1 實例Demo
接下來我將用一個實例Demo進行可通信的服務Service說明
建議先下載Demo再進行閱讀:(carson.ho的Github地址)Demo_for_Service
- 步驟1:在新建子類繼承Service類,並新建一個子類繼承自Binder類、寫入與Activity關聯需要的方法、創建實例
public class MyService extends Service {

    private MyBinder mBinder = new MyBinder();

    @Override
    public void onCreate() {
        super.onCreate();
        System.out.println("執行了onCreat()");
    }

    @Override
    public int onStartCommand(Intent intent, int flags, int startId) {
        System.out.println("執行了onStartCommand()");
        return super.onStartCommand(intent, flags, startId);


    }

    @Override
    public void onDestroy() {
        super.onDestroy();
        System.out.println("執行了onDestory()");
    }

    @Nullable
    @Override
    public IBinder onBind(Intent intent) {
        System.out.println("執行了onBind()");
        //返回實例
        return mBinder;
    }


    @Override
    public boolean onUnbind(Intent intent) {
        System.out.println("執行了onUnbind()");
        return super.onUnbind(intent);
    }

    //新建一個子類繼承自Binder類
    class MyBinder extends Binder {

        public void service_connect_Activity() {
            System.out.println("Service關聯了Activity,並在Activity執行了Service的方法");

        }
    }
}- 步驟2:在主佈局文件再設置兩個Button分別用於綁定和解綁Service
<?xml version="1.0" encoding="utf-8"?>
<RelativeLayout xmlns:android="http://schemas.android.com/apk/res/android"
    xmlns:tools="http://schemas.android.com/tools"
    android:layout_width="match_parent"
    android:layout_height="match_parent"
    android:paddingBottom="@dimen/activity_vertical_margin"
    android:paddingLeft="@dimen/activity_horizontal_margin"
    android:paddingRight="@dimen/activity_horizontal_margin"
    android:paddingTop="@dimen/activity_vertical_margin"
    tools:context="scut.carson_ho.demo_service.MainActivity">

    <Button
        android:layout_centerInParent="true"
        android:id="@+id/startService"
        android:layout_width="wrap_content"
        android:layout_height="wrap_content"
        android:text="啟動服務" />

    <Button
        android:layout_centerInParent="true"
        android:layout_below="@+id/startService"
        android:id="@+id/stopService"
        android:layout_width="wrap_content"
        android:layout_height="wrap_content"
        android:text="停止服務" />

    <Button
        android:layout_centerInParent="true"
        android:layout_below="@id/stopService"
        android:id="@+id/bindService"
        android:layout_width="wrap_content"
        android:layout_height="wrap_content"
        android:text="綁定服務" />

    <Button
        android:layout_centerInParent="true"
        android:layout_below="@id/bindService"
        android:id="@+id/unbindService"
        android:layout_width="wrap_content"
        android:layout_height="wrap_content"
        android:text="解綁服務"
        />
</RelativeLayout>- 步驟3:在Activity通過調用MyBinder類中的public方法來實現Activity與Service的聯繫
即實現了Activity指揮Service幹什麼Service就去幹什麼的功能
MainActivity.java
public class MainActivity extends AppCompatActivity implements View.OnClickListener {

    private Button startService;
    private Button stopService;
    private Button bindService;
    private Button unbindService;

    private MyService.MyBinder myBinder;


    //創建ServiceConnection的匿名類
    private ServiceConnection connection = new ServiceConnection() {

        //重寫onServiceConnected()方法和onServiceDisconnected()方法
        //在Activity與Service建立關聯和解除關聯的時候調用
        @Override
        public void onServiceDisconnected(ComponentName name) {
        }

        //在Activity與Service解除關聯的時候調用
        @Override
        public void onServiceConnected(ComponentName name, IBinder service) {
            //實例化Service的內部類myBinder
            //通過向下轉型得到了MyBinder的實例
            myBinder = (MyService.MyBinder) service;
            //在Activity調用Service類的方法
            myBinder.service_connect_Activity();
        }
    };

    @Override
    protected void onCreate(Bundle savedInstanceState) {
        super.onCreate(savedInstanceState);
        setContentView(R.layout.activity_main);


        startService = (Button) findViewById(R.id.startService);
        stopService = (Button) findViewById(R.id.stopService);

        startService.setOnClickListener(this);
        stopService.setOnClickListener(this);

        bindService = (Button) findViewById(R.id.bindService);
        unbindService = (Button) findViewById(R.id.unbindService);

        bindService.setOnClickListener(this);
        unbindService.setOnClickListener(this);

    }

    @Override
    public void onClick(View v) {
        switch (v.getId()) {

            //點擊啟動Service
            case R.id.startService:
                //構建啟動服務的Intent對象
                Intent startIntent = new Intent(this, MyService.class);
                //調用startService()方法-傳入Intent對象,以此啟動服務
                startService(startIntent);
                break;

            //點擊停止Service
            case R.id.stopService:
                //構建停止服務的Intent對象
                Intent stopIntent = new Intent(this, MyService.class);
                //調用stopService()方法-傳入Intent對象,以此停止服務
                stopService(stopIntent);
                break;

            //點擊綁定Service
            case R.id.bindService:
                //構建綁定服務的Intent對象
                Intent bindIntent = new Intent(this, MyService.class);
                //調用bindService()方法,以此停止服務

                bindService(bindIntent,connection,BIND_AUTO_CREATE);
                //參數說明
                //第一個參數:Intent對象
                //第二個參數:上面創建的Serviceconnection實例
                //第三個參數:標誌位
                //這裡傳入BIND_AUTO_CREATE表示在Activity和Service建立關聯後自動創建Service
                //這會使得MyService中的onCreate()方法得到執行,但onStartCommand()方法不會執行
                break;

            //點擊解綁Service
            case R.id.unbindService:
                //調用unbindService()解綁服務
                //參數是上面創建的Serviceconnection實例
                unbindService(connection);
                break;

                default:
                    break;

        }
    }
}
2.2.2 測試結果

2.2.3 Demo
carson.ho的Github地址:Demo_for_Service
2.3 前臺Service
前臺Service和後臺Service(普通)最大的區別就在於:
- 前臺Service在下拉通知欄有顯示通知(如下圖),但後臺Service沒有;

- 前臺Service優先級較高,不會由於系統內存不足而被回收;後臺Service優先級較低,當系統出現內存不足情況時,很有可能會被回收
2.3.1 具體使用
用法很簡單,只需要在原有的Service類對onCreate()方法進行稍微修改即可,如下圖:
@Override
    public void onCreate() {
        super.onCreate();
        System.out.println("執行了onCreat()");

        //添加下列代碼將後臺Service變成前臺Service
        //構建"點擊通知後打開MainActivity"的Intent對象
        Intent notificationIntent = new Intent(this,MainActivity.class);
        PendingIntent pendingIntent = PendingIntent.getActivity(this,0,notificationIntent,0);

        //新建Builer對象
        Notification.Builder builer = new Notification.Builder(this);
        builer.setContentTitle("前臺服務通知的標題");//設置通知的標題
        builer.setContentText("前臺服務通知的內容");//設置通知的內容
        builer.setSmallIcon(R.mipmap.ic_launcher);//設置通知的圖標
        builer.setContentIntent(pendingIntent);//設置點擊通知後的操作

        Notification notification = builer.getNotification();//將Builder對象轉變成普通的notification
        startForeground(1, notification);//讓Service變成前臺Service,並在系統的狀態欄顯示出來

    }
2.3.2 測試結果
運行後,當點擊Start Service或Bind Service按鈕,Service就會以前臺Service的模式啟動(通知欄上有通知),如下圖

2.4 遠程Service
具體請看我寫的另外一篇文章:Android:遠程服務Service(含AIDL & IPC講解)
3. 使用場景
- 通過上述描述,你應該對Service類型及其使用非常瞭解;
- 那麼,我們該什麼時候用哪種類型的Service呢?
- 各種Service的使用場景請看下圖:
 使用場景
使用場景
4. 總結
- 本文對Service的使用進行了全面解析(本地、可通信、前臺和遠程Service)
- 如果你還想了解關於Service的其他知識,請瀏覽以下文章:
Android四大組件:Service史上最全面解析
Android:Service生命週期最全面解析
Android:(本地、可通信的、前臺、遠程)Service使用全面介紹
Android:遠程服務Service(含AIDL & IPC講解)
Android多線程全面解析:IntentService用法&源碼
- 接下來會介紹繼續介紹Android開發中的相關知識,有興趣可以繼續關注Carson_Ho的安卓開發筆記
請點贊!因為你們的贊同/鼓勵是我寫作的最大動力!
相關文章閱讀
Android開發:最全面、最易懂的Android屏幕適配解決方案
Android開發:Handler異步通信機制全面解析(包含Looper、Message Queue)
Android開發:最全面、最易懂的Webview詳解
Android開發:JSON簡介及最全面解析方法!
Android開發:頂部Tab導航欄實現(TabLayout+ViewPager+Fragment)
Android開發:底部Tab菜單欄實現(FragmentTabHost+ViewPager)
歡迎關注Carson_Ho的簡書!
不定期分享關於安卓開發的乾貨,追求短、平、快,但卻不缺深度。

</div>