C++ 對象模型
這是C++語言的一系列文章,內容取自於網易微專業《C++開發工程師(升級版)》。
本文是聽了侯捷老師關於“C++對象模型”的課程以後,總結而成的。 課程中講到了範型編程和麵向對象編程兩種模式,因此本文的主題是 template。 包括類模板、函數模板、成員模板、模板特化和偏特化、可變模板參數、模板嵌套等。
說到面向對象,本文的另一個主題是C++底層的對象模型,包括this指針、虛指針vptr、虛表vtable、虛函數、多態等。
第三週:C++對象模型
Part 1:class 的高級用法
這一部分,我們介紹一些C++ 類的高級用法:conversion function、non-explicit-one-argument constructor、pointer-like classes、function-like classes。
1.1 conversion function (轉換函數)
轉換函數 可以將對象 默認轉換為另一種類型,方便程序的調用。
其作用與只接收一個參數的構造函數(不使用 explicit修飾符)作用正好相反。關於構造函數的坑參考這篇文章。 下一個小結講解的就是 non-explicit-one-argument constructor。
廢話少說,先上個例子(注意觀察它的使用方法):
// Fraction 類
class Fraction {
public:
  Fraction(int num, int den=1): m_numerator(num), m_denominator(den){};
  operator double() const {return (double)m_numerator/m_denominator; };
  private:
    int m_numerator;
    int m_denominator;
};

// main 函數(使用 Fraction 的轉換函數 operator double() const)
int main(int argc, char * argv[]) {
  Fraction f(3, 5);
  double d = 4.0 + f;      // f 調用 operator double() 轉換為一個 double 值
  std::cout << "d = " << d << std::endl;
}
編譯器認為必要時,將對象轉換為某種特定的類型。轉換函數的三個特徵:
- 轉換函數 的聲明中不需要寫返回類型 (因為返回類型和函數名稱相同)
- 函數名必須是 operator xxx
- 必須使用 const 修飾符,因為轉換函數不會修改 this 指針
1.2 non-explicit-one-argument constructor
non-explicit-one-argument constructor 有下面兩個語法特徵:
- 這類構造函數只接收一個參數
- 沒有使用 explicit 修飾符 (默認 implicit)
該函數在編譯器認為需要的時候,將參數類型的變量轉換成該類型的對象。具體看下面代碼:
// Fraction 類
class Fraction {
  public:
    Fraction(int num, int den=1): m_numerator(num), m_denominator(den){};
    Fraction operator+(const Fraction& f) {
      return Fraction(m_denominator * f.m_numerator + m_numerator * f.m_denominator, m_denominator * f.m_denominator);
    };

    friend ostream& operator << (ostream& os, const Fraction& f);
  private:
    int m_numerator;
    int m_denominator;
};

ostream& operator<<(ostream& os, const Fraction& f) {
  return os << f.m_numerator << "/" << f.m_denominator;
}

// main 函數(注意變量 d 的類型)
int main(int argc, char * argv[]) {
  Fraction f(3, 5);
  Fraction d =  f + 4;  // here 4 is converted to a Fraction(4, 1), 4+f is not allowed
  std::cout << "d = " << d << std::endl;
}
使用 explicit 修飾構造函數以後,上面的默認轉換就會失敗。
1.3 pointer-like class (智能指針)
像指針的類,是指該 class 的對象表現出來像一個指針。這麼做的目的是實現一個比指針更強大的結構。 標準庫內值了一些指針類,如 std::shared_ptr, std::weak_ptr, std::unique_ptr,具體參考cplusplus
1.3.1 shared_ptr 智能指針
實現一個智能指針類,則必須重載 (override) 兩個成員函數: operator*() 和 operator->()。
shared_ptr 代碼的抽離出來一部分如下:
// shared_ptr 模板類的定義
template <typename T>
class shared_ptr{
public:
  T& operator*() const { // 解引用
    return *px;
  }
  T* operator->() const { // 取指針,這個方法有點詭異
    return px;
  }

  shared_ptr(T *p): px(p) {}
private:
  T* px;
  long* pn;
};

// Foo 類
struct Foo {
  // 省略其它部分,關注 method
  void method() { //... }
};

// 使用 shared_ptr
int main() {
  shared_ptr<Foo> sp(new Foo);

  Foo f(*sp);  // 使用 解引用 操作符 *
  sp->method();  // 使用 操作符 ->  ( 等價於 px->method() )
}
關於 operator -> ,從語法角度上來說,-> 是可重生的,所以下面 main函數中才可以這樣使用。
很容易發現,除了構造,shared_ptr 在使用上與裸指針幾乎沒有差別,但是不需要手動釋放內存。 當然,仿指針類的能力遠不止於自動釋放內存,還有很多,這裡我們看看標準庫中 std::shared_ptr的附加功能。
std::shared_ptr 不僅提供了有限的垃圾回收特性,還提供了內存擁有權的管理 (ownership),點擊這裡查看詳情
1.3.2 iterator 迭代器
pointer-like classes 在迭代器中也有廣泛的應用。 標準庫中所有的容器(std::vector等) 都有迭代器。換句話說,標準庫的迭代器也實現了 operator* 和 operator-> 方法。
每個迭代器對象 指向 一個容器變量,但同時實現了下面幾個方法:
- operator==
- operator!=
- operator++
- operator–
關於 迭代器中 operator* 和 operator-> 的實現,也相當值得考究:
// 忽略上下文

reference operator*() const {
  return (*node).data;
}

pointer operator->() const { // 藉助於 operator* 實現
  return &(operator*());
}
你可以像下面這樣使用這兩個方法:
list<Foo>::iterator ite;

//... 省略一部分代碼...

*ite;   // 獲取 Foo 對象的引用

ite->method();
// 意思是 調用 Foo::method()
// 相當於 (*ite).method();
// 相當於 (&(*ite))->method();
1.4 function-like classes (仿函數)
1.4.1 什麼是仿函數?
仿函數其實不是函數,是一個類,但是它的行為和函數類似。在實現的層面上,一個類一旦定義了 operator() 方法,就可以稱之為仿函數。
C++標準庫內置了很多仿函數模板。 我們先用 std::less 和 std::less_equal 為例,對仿函數的用法有一個直觀的認識:
// less example (http://www.cplusplus.com/reference/functional/less/)
// compile: g++ -o main main.cpp -lm
#include <iostream>     // std::cout
#include <functional>   // std::less
#include <algorithm>    // std::sort, std::includes

int main () {
  // 自己寫的簡單例子, 表達式 "std::less<int>()" 創建了一個臨時對象
  int a = 5, b = 4;
  std::cout << "std::less<int>()(" << a << ", " << b << "): " << std::less<int>()(a, b) << std::endl;
  std::cout << "std::less<int>()(" << b << ", " << a << "): " << std::less<int>()(b, a) << std::endl;

  std::cout << "std::less_equal<int>()(" << a << ", " << b << "): " << std::less_equal<int>()(a, b) << std::endl;
  std::cout << "std::less_equal<int>()(" << b << ", " << a << "): " << std::less_equal<int>()(b, a) << std::endl;
  std::cout << "std::less_equal<int>()(" << a << ", " << a << "): " << std::less_equal<int>()(a, a) << std::endl;

  // 網站上帶的高級例子
  int foo[]={10,20,5,15,25};
  int bar[]={15,10,20};
  std::sort (foo, foo+5, std::less<int>());  // 5 10 15 20 25
  std::sort (bar, bar+3, std::less<int>());  //   10 15 20
  if (std::includes (foo, foo+5, bar, bar+3, std::less<int>()))
    std::cout << "foo includes bar.\n";
  return 0;
}
1.4.2 仿函數的實現
仿函數實際上是一個 類 (class),這個類實現了 operator() 方法。 下面這個是 C++11 中 std::less 的實現:
// C++11 中的實現(侯捷老師講的是 C++98中的實現)
template <class T> struct less {
  bool operator() (const T& x, const T& y) const {return x<y;}
  typedef T first_argument_type;
  typedef T second_argument_type;
  typedef bool result_type;
};
注意:std::less 是類模板。在課程中,侯捷老師提到了 unary_function 和 binary_function,這兩個類定義了參數類型,C++11中已經不再 使用,而是內置到 std::less 中,具體參考這裡
1.5 命名空間 (namespace)
命名空間用於 模塊分離和解耦。為了更好地說明一些細節,這裡使用從 msdn 摘取一段話:
A namespace is a declarative region that provides a scope to the identifiers (the names of types, functions, variables, etc) inside it.
Namespaces are used to organize code into logical groups and to prevent name collisions that can occur especially when your code base includes multiple libraries.
All identifiers at namespace scope are visible to one another without qualification.
Identifiers outside the namespace can access the members by using the fully qualified name for each identifier, for example std::vector<std::string> vec;, or else by a using Declaration for a single identifier (using std::string), or a using Directive (C++) for all the identifiers in the namespace (using namespace std;).
Code in header files should always use the fully qualified namespace name.
Part 2 模板 (template)
2.1 class template (類模板)
前面幾篇博客對類模板有所涉及,這裡不再贅述。C++標準庫的容器都是類模板的範例,比如:
2.2 function template (函數模板)
對於 function template ,前面幾篇博客也都有所涉及。C++標準庫 algorithm 分類下有將近 90 個函數模板, 這裡我列出幾個:
下面我們以 std::for_each 為例,看下如何使用函數模板:
// for_each example (來源:http://www.cplusplus.com/reference/algorithm/for_each/)
#include <iostream>     // std::cout
#include <algorithm>    // std::for_each
#include <vector>       // std::vector

void myfunction (int i) {  // function:
  std::cout << ' ' << i;
}

struct myclass {           // function object type:
  void operator() (int i) {std::cout << ' ' << i;}
} myobject;

int main () {
  std::vector<int> myvector;
  myvector.push_back(10);
  myvector.push_back(20);
  myvector.push_back(30);

  std::cout << "myvector contains:";
  for_each (myvector.begin(), myvector.end(), myfunction);
  std::cout << '\n';

  // or:
  std::cout << "myvector contains:";
  for_each (myvector.begin(), myvector.end(), myobject);
  std::cout << '\n';

  return 0;
}
在這個例子中,注意函數 myfunction 和 仿函數 myobject 的用法,think twice about that。
另外,使用函數模板時,不需要指定特化類型,因為編譯器會根據參數進行自動推導。
2.3 Member method (成員模板,默認為成員函數模板)
從使用者的角度來看,成員模板 比 類模板 具有更大的自由度。由於C++強大的繼承機制,成員模板也有一些使用場景。 這裡以 shared_ptr 為例:
// 定義 類模板 shared_ptr
template <typename _Tp>
class shared_ptr : pubic __shared_ptr<_Tp> {
  //... 省略代碼 ...

  template <typename _Tp1>
  explicit shared_ptr(_Tp1* __p) : __shared_ptr<_TP>(__p) {}

  // ... 省略代碼 ...
};

// 使用 shared_ptr 的模板構造函數
// Derived1 類是 Base1 的子類
int main() {
  Base1 *ptr = new Derived1;  // 向上轉型

  shared_ptr<Base1> sptr(new Derived1);  // 支持向上轉型
}
這個例子中,成員模板允許 shared_ptr 支持接收子類對象的指針,構造一個父類shared_ptr。
2.4 specialization (模板特化)
模板本身是泛化的,允許用戶在使用時進行特化。所謂“特化”,其實是指 在編譯器的展開。
但是模板的設計有時候不能滿足所有特化類型的要求,比如 std::vector 容納 bool 時會有問題,
所有有了 std::vector<bool> 的特化版本。
2.4.1 模板偏特化
模板偏特化 可以分為兩類:
- 個數上的“偏”
例如 std::vector<int, typename Alloc=.....> 相對於 std::vector<typename T, typename Alloc=......>
- 類型上的“偏” (由對象擴展到 指針類型)
這裡直接看一個例子:
// 泛化版本
template <typename T>
class C {
  //...
};

// 擴展到指針的 特化版本
template <typename T>
class C<T*> {
  //...
};

// 使用 特化版本
int main() {
  C<string> obj1;    // 正常的特化版本
  C<string*> obj2;   // 特化的指針版本
}
2.4.2 模板模板參數(模板嵌套)
模板模板參數是指 一個模板作為另一個模板的參數存在。這樣的設計在使用上更為靈活。這裡直接上一個例子:
// 定義一個類模板,它使用一個模板作為模板參數
template <typename T,
  template <typename T>
  class Container
>
class XCls {
private:
  Container<T> c;
public:
  // ...
};

// 定義Lst
template<typename T>
using Lst = list<T, allocator<T> >;     // 注意: Lst 只有一個模板參數,而 list 有兩個模板參數
// 使用該模板
int main() {
  XCls<string, list> mylist1;   // 合法的定義

//XCls<string, Lst> mylist2;    // 不合法,因為 XCls 的第二個模板參數只接受一個參數(有點繞,think about it)
}
這個模板的靈活性在於,第二個模板參數,你可以使用 std::list, std::stack, std::vector 等迭代器的特化版本作為參數,也就是說底層可以接入不同的“內存管理方案”(這個詞相對準確)。
Part 3:C++語言層面的相關主題
3.1 C++標準庫概論
這裡用一張圖表示
3.2 variadic templates:模板的可變參數列表 (C++11)
模板的可變參數列表與 正常的可變參數列表是一樣的,只是語法上有些特殊。 下面是一個 print 的例子:
// 定義 print 函數
void print() {}

template<typename T, typename... Types>
void print(const T& firstArg, const Types&... args) {
  cout << firstArg << endl;
  print(args...);
}

// 使用 print 函數
int main() {
  print(7.5, "hello", bitset<16>(377),42);
}
另外,對於模板參數,C++ 提供了輔助函數,用來獲取可變參數列表的長度,函數簽名為 size_type sizeof...(args)。
3.3 auto (C++11)
auto 允許用戶不聲明變量的類型,而是留給編譯器去推導。它是C++11加入的語法糖,可以減少有效代碼量。
關於 auto,更多細節參考 msdn
3.4 range-based for (c++11)
這是C++11 新增加的語法,可以有效減少代碼量,與 auto 配合使用更佳。考慮到是否需要修改數組的值,決定是否採用引用,看代碼:
vector<double> vec;
for (auto elem: vec) {  // 按值傳遞,不會修改數組的值
  cout << elem << endl;
  elem *= 3;   // 即便這樣寫, 也只是修改了一個副本,不會修改 vec 的值。
}

for (auto& elem: vec){  // 按引用傳遞
  elem *= 3;  // 使用引用會修改數組的值
}
更多參考 msdn上的描述。
3.5 關於 reference (一些引起誤解的地方)
3.5.1 reference 的特徵
reference的兩個特徵:
- reference類型的變量一旦 代表某個變量,就永遠不能代表另一個變量
- reference類型的變量 大小和地址 與 原對象相同 (即 sizeof 和 operator& 的返回值)
下面用侯捷老師PPT上的一段代碼來說明:
int main() {
  int x = 0;
  int* p = &x;
  int& r = x;  // r 代表 x,兩者的值都是 0
  int x2 = 5;

  r = x2;      // 這一行賦值的結果是:x 的值也變成了 5
  int& r2 = r; // r2、r 都代表 x,即值都是 5
}
上面這個例子中,需要注意:
- sizeof(x) == sizeof(r)
- &x == &r
3.5.2 應用場景
reference 通常用在兩個地方:
- 參數傳遞 (比較快)
- 返回類型
3.6 構造和析構 (時間先後)
本小節主要講解構造和析構 在繼承和組合體系下的運作機制。
3.6.1 繼承體系中的構造和析構
構造:由內而外。內是指Base,外指Derived 析構:由外而內。先析構Derived Class,再析構Base Class 的部分
注意:Base Class 的析構函數必須是 virtual 的,否則會報出 undefined behaviors 的錯誤。 下面這段代碼重現了這個錯誤:
// 這段代碼 來源於 stackoverflow ,但是經過了大量修改
// http://stackoverflow.com/questions/461203/when-to-use-virtual-destructors

#include <iostream>

class Node {
public:
    Node() { std::cout << "Node()" << std::endl; }
    ~Node() { std::cout << "~Node()" << std::endl; }
};

class Base
{
public:
    Base() { std::cout << "Base()" << std::endl; }
    ~Base() { std::cout << "~Base()" << std::endl; }
};

class Derived : public Base
{
public:
    Derived()  { std::cout << "Derived()"  << std::endl;  m_pNode = new Node(); }
    ~Derived() { std::cout << "~Derived()" << std::endl;  delete m_pNode; }

private:
    Node* m_pNode;
};

int main() {
    // 注意:Base的析構函數設置為 virtual
    Base *b = new Derived();
    // 使用 b
    delete b; // 結果是:調用了 Base的構造函數

    std::cout << "execute complete" << std::endl;
}
上面這段代碼打印結果是:
Base()
Derived()
Node()
~Base() // 為什麼只打印了 這個???
execute complete
注意: 在實際的測試中,代碼沒有報出 undefined behavior 錯誤。但是出現了內存洩漏 m_pNode 的內存沒有被釋放。 關於這段代碼的解釋,我聯想到侯捷老師講到的靜態綁定和動態綁定,網上一張相關的ppt, 點擊C++-dynamic-binding查看。
然後,我給 ~Base() 和 ~Derived() 都加上了 virtual (這裡就不再列出代碼),結果仍然令人疑惑,結果如下:
Base()
Derived()
Node()
~Derived()
~Node()
~Base()    // 為什麼還會打印這個???
execute complete
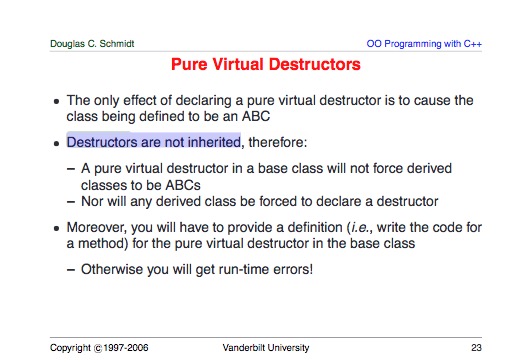
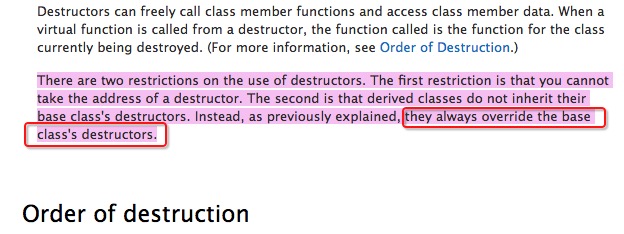
又查了下文檔,在 msdn的文檔和 C++ dynamic binding.pdf 文檔中,都提到 destructor 是不可繼承的(看下圖):


~Base() 雖然為 virtual 函數,但其不可繼承(所以總是被override),因此析構的時候,會先調用 ~Derived(), 然後調用 ~Base()。
關於繼承體系下,析構的順序,可以參考 msdn。
本文到此為止,謝謝耐心閱讀。