Raspberry Pi 2 Bare Metal Multicore JTAG Debugging
To get going with multicore development and JTAG debugging, these code snippets and pieces of information should be useful.
1. JTAG debugging
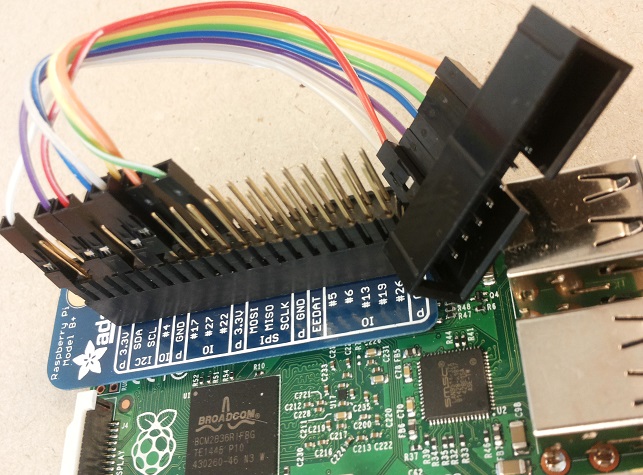
To enable JTAG on Raspberry Pi 2, some of the GPIO pins
needs to be configured to their “alternate” function.
Create a small application that calls the function below.
Build the application, and place the kernel.img file
on the SD-card. Now, when the Raspberry Pi 2 boots, JTAG
pins will be enabled.
/*--------------------------------------------------*/
static void jtag_enable(void)
{
    // http://sysprogs.com/VisualKernel/tutorials/raspberry/jtagsetup/
    /* -------- JTAG SETUP --------
    JTAG pin    JTAG sig    GPIO        Header pin
    1           VREF        N/A         1
    3           nTRST       GPIO22      15
    4           GND         N/A         9
    5           TDI         GPIO4       7
    7           TMS         GPIO27      13
    9           TCK         GPIO25      22
    11          RTCK        GPIO23      16
    13          TDO         GPIO24      18
    -------------------------------*/

    GPFSEL2_bit.FSEL22 = GPFSEL_ALT4;   // nTRST
    GPFSEL0_bit.FSEL4  = GPFSEL_ALT5;   // TDI
    GPFSEL2_bit.FSEL27 = GPFSEL_ALT4;   // TMS
    GPFSEL2_bit.FSEL25 = GPFSEL_ALT4;   // TCK
    GPFSEL2_bit.FSEL23 = GPFSEL_ALT4;   // RTCK
    GPFSEL2_bit.FSEL24 = GPFSEL_ALT4;   // TDO
}
2. Multicore JTAG debugging
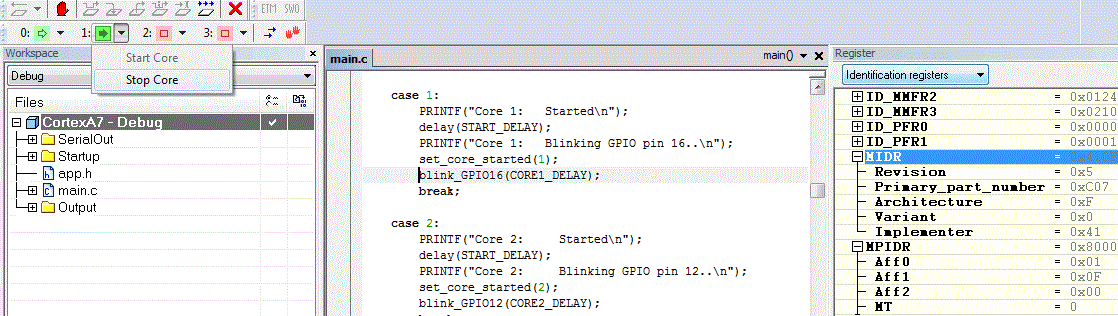
To get in contact with all 4 CPU cores, write the following in a bcm2836.ProbeConfig file:
"A7_0" "Cortex-A7:0@0x80010000"
+"A7_1" "Cortex-A7:0@0x80012000"
+"A7_2" "Cortex-A7:0@0x80014000"
+"A7_3" "Cortex-A7:0@0x80016000"
Specify the ProbeConfig file on:
Project > Options > I-jet > JTAG/SWD > Probe configuration file.
Enable Multicore with: Project > Options > Debugger > Multicore > Number of cores : 4.
The Debug Log should say:
Connecting on DAP APB-AP port 0 to core Cortex-A7 r0p5 at 0x80010000.
Connecting on DAP APB-AP port 0 to core Cortex-A7 r0p5 at 0x80012000.
Connecting on DAP APB-AP port 0 to core Cortex-A7 r0p5 at 0x80014000.
Connecting on DAP APB-AP port 0 to core Cortex-A7 r0p5 at 0x80016000.
3. Multicore coding
To enable a specific core, use the function below:
#define CORE0_MBOX3_SET             0x4000008C

static void core_enable(uint32_t core, uint32_t addr)
{
    // http://www.raspberrypi.org/forums/viewtopic.php?f=72&t=98904&start=25
    volatile uint32_t *p;
    p = (uint32_t*)(CORE0_MBOX3_SET + 0x10 * core);

    *p = addr;
}
For example, to enable all CPU cores and make them start at address 0x8000:
core_enable(1, 0x8000);
core_enable(2, 0x8000);
core_enable(3, 0x8000);
Another nice function to have is get_core_id:
uint32_t get_core_id(void)
{
    uint32_t core_id;
    asm volatile ("mrc p15, 0, %0, c0, c0,  5" : "=r" (core_id));
    return core_id & 0x3;
}
With this function, the running code can detect on which CPU core it is executing. This is useful for a switch-case, like this for example:
volatile uint32_t core_id = get_core_id();

switch (core_id) {
case 0:
    // Code for Core 0
    core_enable(1, 0x8000);
    core_enable(2, 0x8000);
    core_enable(3, 0x8000);
    break;
case 1:
    // Code for Core 1
    break;
case 2:
    // Code for Core 2
    break;
case 3:
    // Code for Core 3
    break;
default:
    while (1) {}
    break;
}