Day 14:SPI (Part 2) - ftrace 啦!哪次不 ftrace?
[TOC]
了解了 SPI 基本的配置之後,就可以開始簡單的寫一些 SPI 的程式。接下來會展示 Raspberry Pi 跟 Arduino 中 SPI 的相關配置,並且在他們之間傳輸訊息。最後,再用 ftrace 看看傳輸的過程中用到了核心的哪些部分。
啟動 SPI (Device Tree 表示:)
在打開之前,可以先看看現在的 Device Tree 長什麼樣子:
$ dtc -I fs /proc/device-tree | less
就會找到下面 3 個跟 SPI 有關的部分:
spi0
其實這邊一開始不會看到他是 spi0,而是之後去查了 aliases 的部分,才會知道他對應的是 spi0。不過為了標題看起來整齊,所以我就先把他補上去。
spi@7e204000 {
         compatible = "brcm,bcm2835-spi";
         clocks = < 0x07 0x14 >;
         status = "disabled";
         #address-cells = < 0x01 >;
         interrupts = < 0x02 0x16 >;
         cs-gpios = < 0x10 0x08 0x01 0x10 0x07 0x01 >;
         #size-cells = < 0x00 >;
         dma-names = "tx\0rx";
         phandle = < 0x28 >;
         reg = < 0x7e204000 0x200 >;
         pinctrl-0 = < 0x0e 0x0f >;
         dmas = < 0x0b 0x06 0x0b 0x07 >;
         pinctrl-names = "default";

         spidev@1 {
                 compatible = "spidev";
                 #address-cells = < 0x01 >;
                 #size-cells = < 0x00 >;
                 phandle = < 0x68 >;
                 reg = < 0x01 >;
                 spi-max-frequency = < 0x7735940 >;
         };

         spidev@0 {
                 compatible = "spidev";
                 #address-cells = < 0x01 >;
                 #size-cells = < 0x00 >;
                 phandle = < 0x67 >;
                 reg = < 0x00 >;
                 spi-max-frequency = < 0x7735940 >;
         };
};
spi1
spi@7e215080 {
        compatible = "brcm,bcm2835-aux-spi";
        clocks = < 0x15 0x01 >;
        status = "disabled";
        #address-cells = < 0x01 >;
        interrupts = < 0x01 0x1d >;
        #size-cells = < 0x00 >;
        phandle = < 0x6d >;
        reg = < 0x7e215080 0x40 >;
};
spi2
spi@7e2150c0 {
        compatible = "brcm,bcm2835-aux-spi";
        clocks = < 0x15 0x02 >;
        status = "disabled";
        #address-cells = < 0x01 >;
        interrupts = < 0x01 0x1d >;
        #size-cells = < 0x00 >;
        phandle = < 0x6e >;
        reg = < 0x7e2150c0 0x40 >;
};
aliases
去找 aliases 的部分,就會發現上面 3 個部分真的依序是對應到 spi1、spi2、spi3:
aliases {
        ...
        spi2 = "/soc/spi@7e2150c0";
        ...
        spi0 = "/soc/spi@7e204000";
        ...
        spi1 = "/soc/spi@7e215080";
        ...
};
可以注意到 3 個區塊裡面,SPI 的狀態都是 disabled。現在用 raspi-config 去把 SPI 功能打開,在 "Interfacing Option" 中的 "SPI" 那個選項:
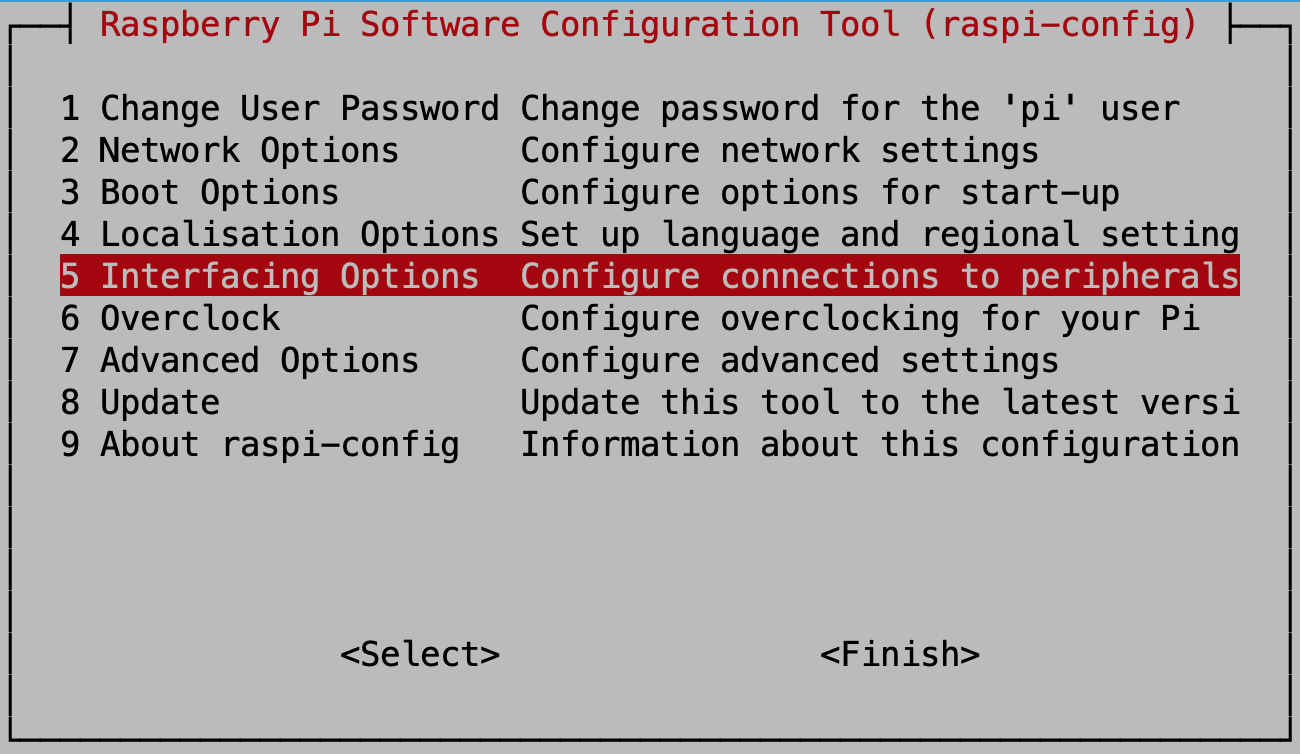
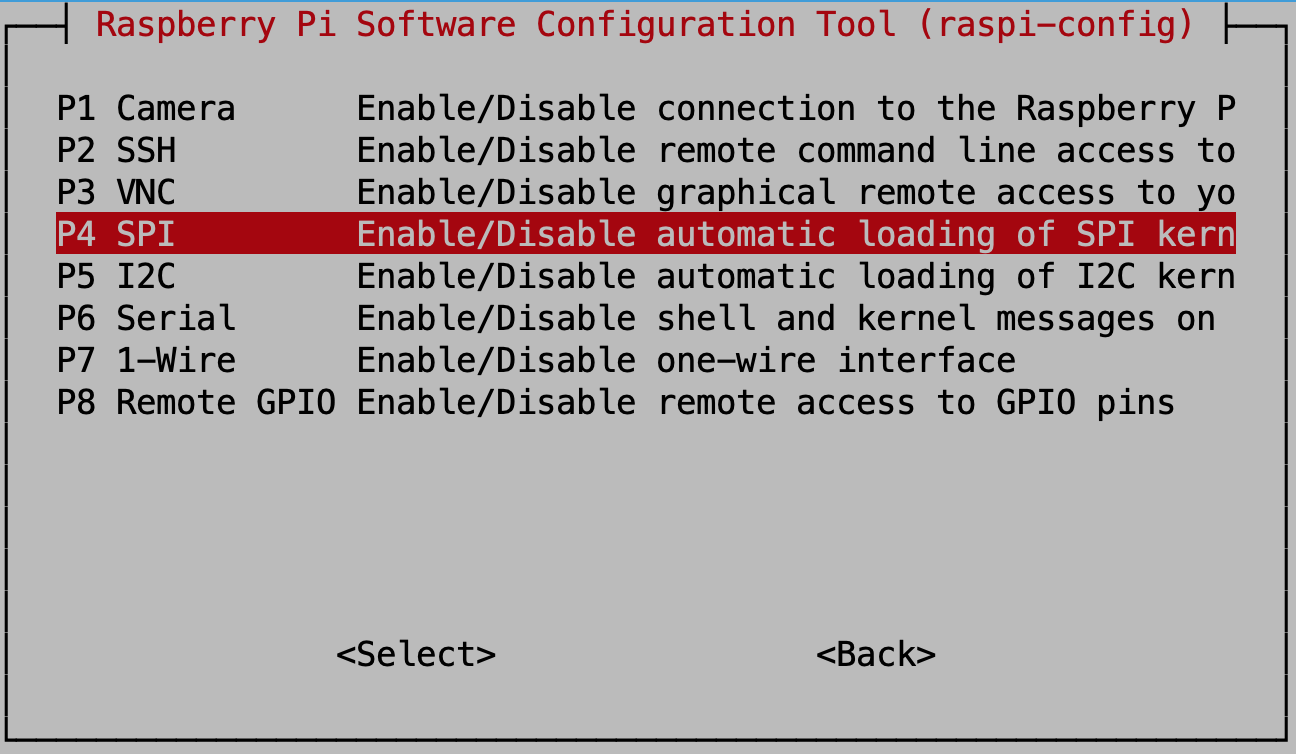
打開之後再看一次 Device Tree 長怎樣:
$ dtc -I fs /proc/device-tree | less
可以發現原來的 spi0 中,status 從 disabled 變成 okay 了 (但另外兩個仍然是 disabled):
spi@7e204000 {
        compatible = "brcm,bcm2835-spi";
        clocks = < 0x07 0x14 >;
+       status = "okay";
        #address-cells = < 0x01 >;
        interrupts = < 0x02 0x16 >;
        cs-gpios = < 0x10 0x08 0x01 0x10 0x07 0x01 >;
        #size-cells = < 0x00 >;
        dma-names = "tx\0rx";
        phandle = < 0x28 >;
        reg = < 0x7e204000 0x200 >;
        pinctrl-0 = < 0x0e 0x0f >;
        dmas = < 0x0b 0x06 0x0b 0x07 >;
        pinctrl-names = "default";

        spidev@1 {
                compatible = "spidev";
                #address-cells = < 0x01 >;
                #size-cells = < 0x00 >;
                phandle = < 0x68 >;
                reg = < 0x01 >;
                spi-max-frequency = < 0x7735940 >;
        };

        spidev@0 {
                compatible = "spidev";
                #address-cells = < 0x01 >;
                #size-cells = < 0x00 >;
                phandle = < 0x67 >;
                reg = < 0x00 >;
                spi-max-frequency = < 0x7735940 >;
        };
};
除此之外,如果去看 /boot/config.txt 的話,也可以發現 dtparam=spi 從原來的 off 變成 on:
# Uncomment some or all of these to enable the optional hardware interfaces
dtparam=i2c_arm=on
#dtparam=i2s=on
-dtparam=spi=off
+dtparam=spi=on
硬體配置
現在要讓 Raspbery Pi 跟 Arduino 互傳資料,但有一個問題是 Raspberry Pi 的電路準位是用 3.3V,而 Arduino 是 5V。所以這彼此之間需要一個轉換,否則 Arduino 傳 5V 的訊號給 Raspberry Pi 的時候,就會有毀壞的風險。不過這件事情也有專門的 IC 可以處理,只要搜尋 Logic Level Shifter 就可以找到很多相關的硬體資訊。像這樣:
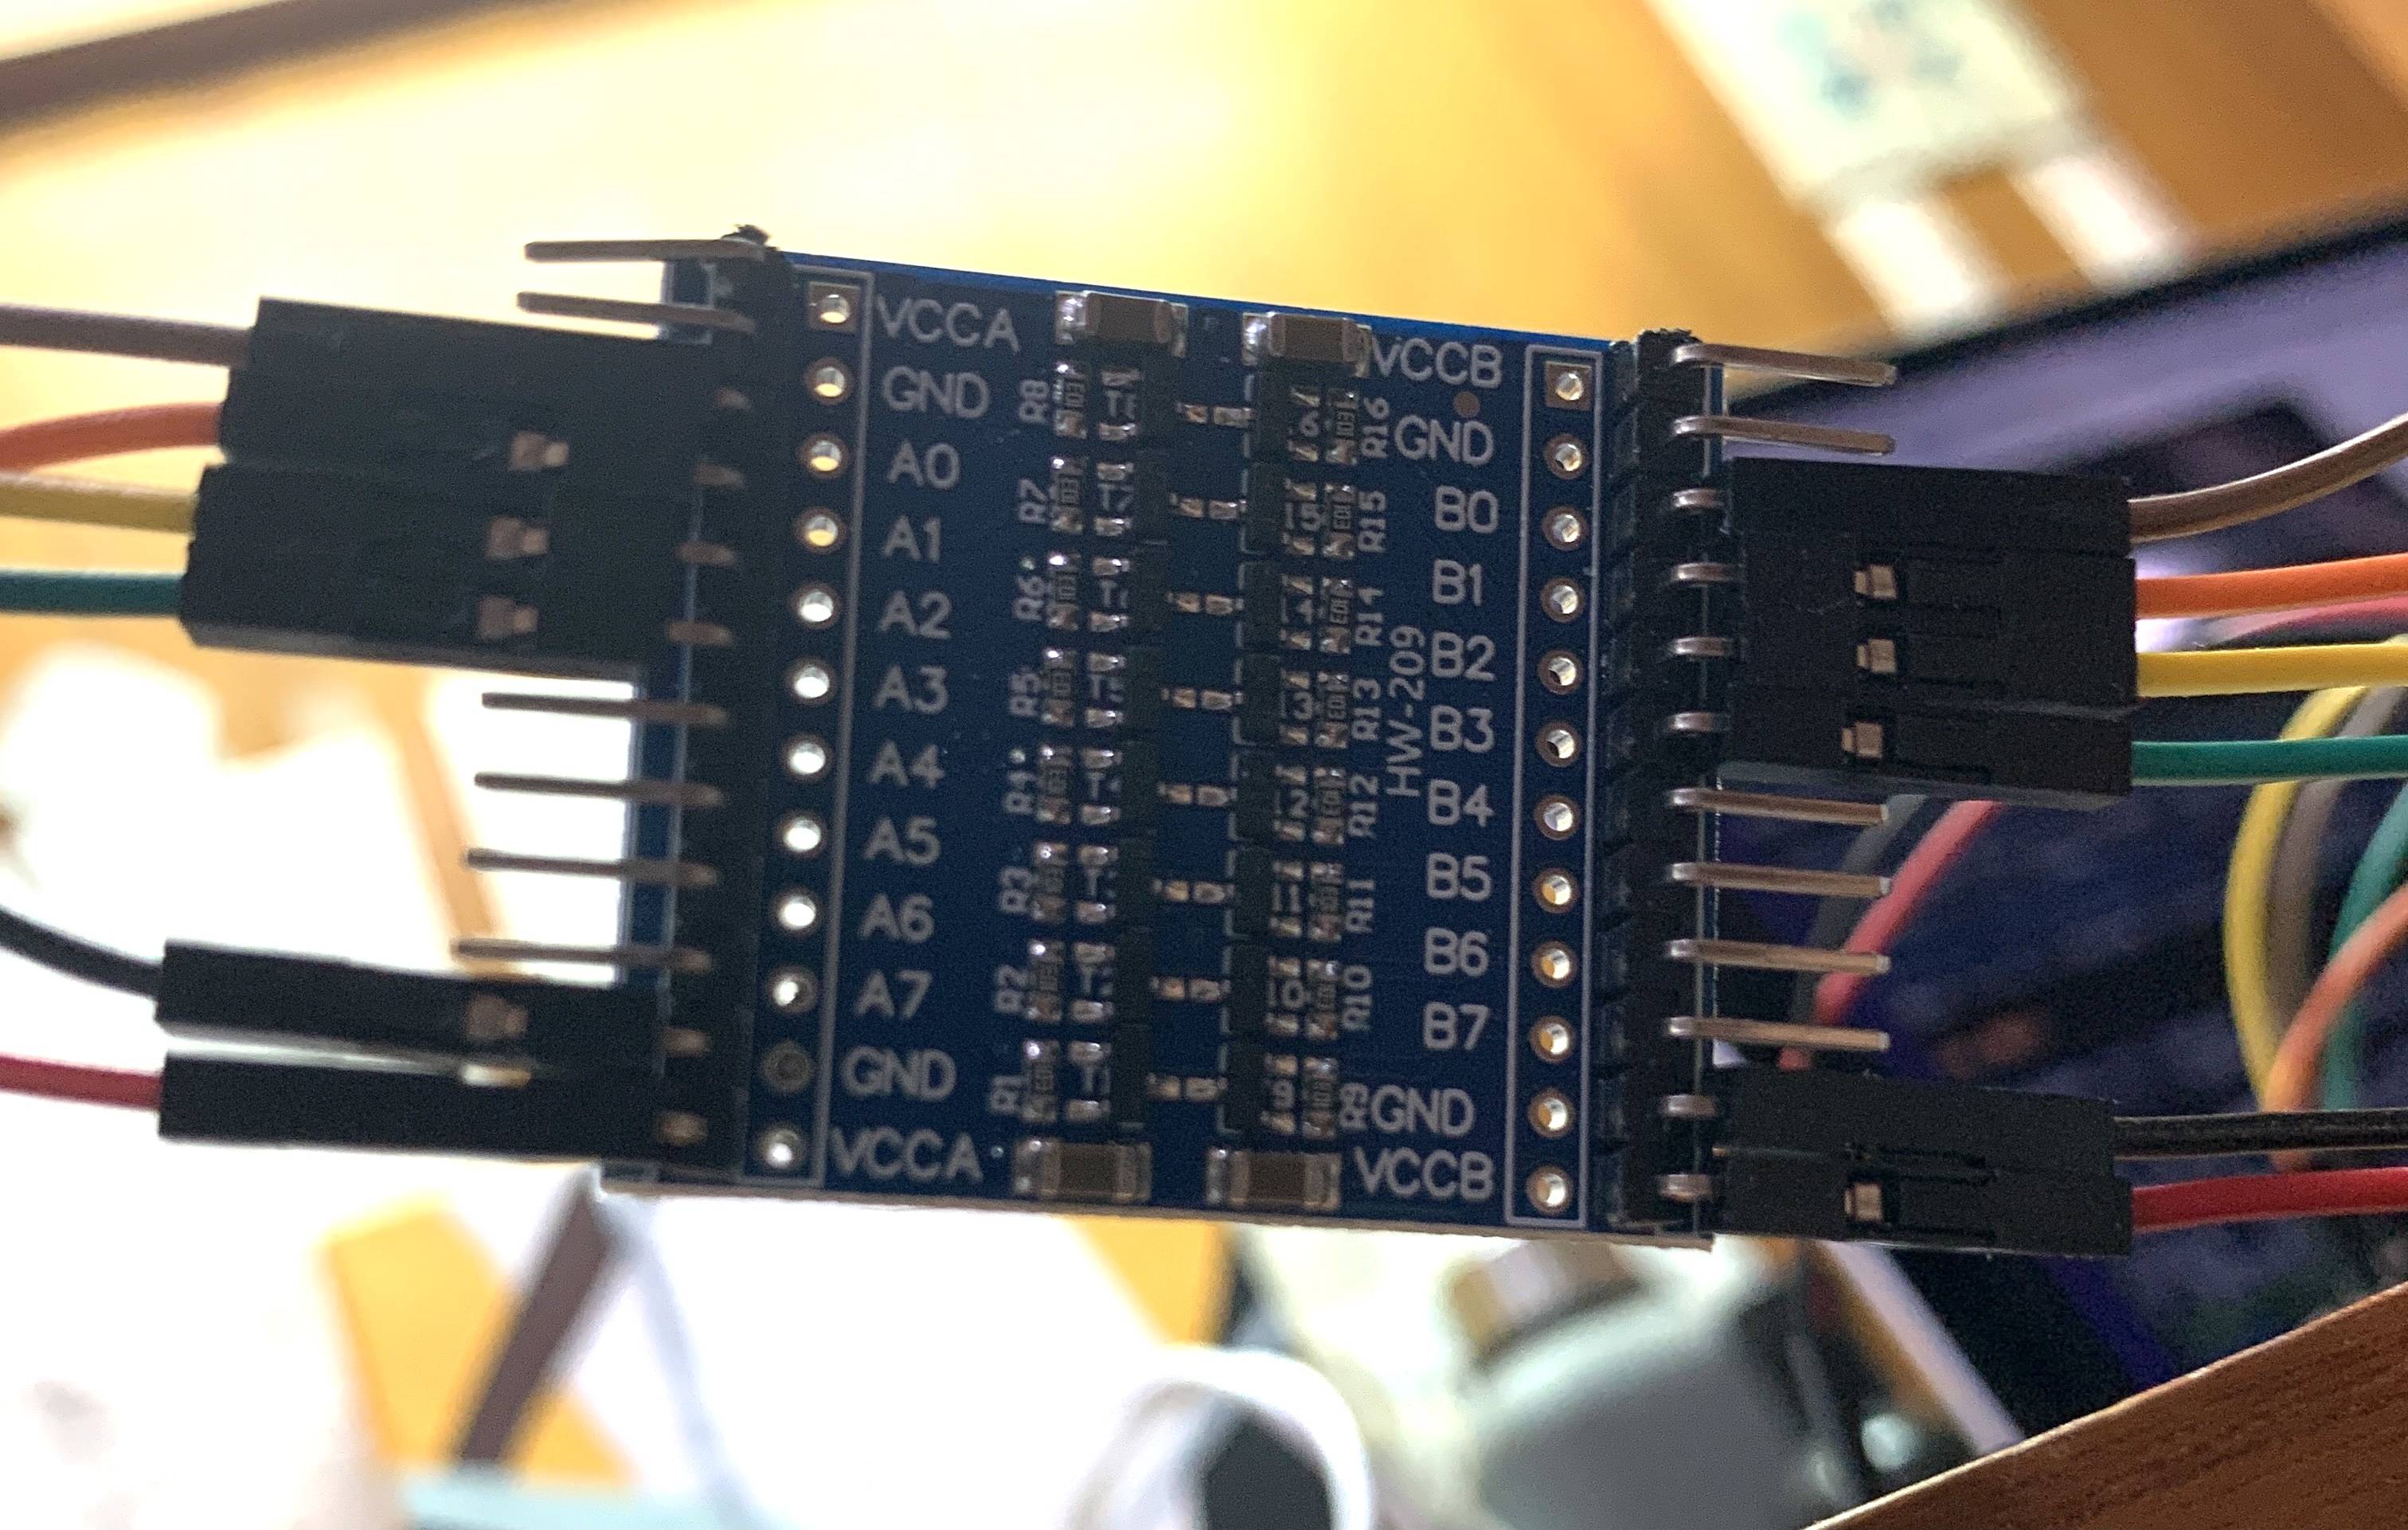
而接下來的線路配置就很單純:MOSI、MISO、SCLK、SS (也就是 CS、CE。都是指同一個東西) 透過 Logic Level Shifter 對接,然後也把對應的電壓 (Arduino 5V、Raspberry Pi 3.3V) 各自接上 Logic Level Shifer 對應的電壓輸入即可。
硬體:Arduino
Arduino 的 SPI 相關說明可以參考官方文件中的 SPI library 一節。以 Ardino UNO 為例,4 個腳位分別對應為:
| FUNCTION | NUMBER |
|---|---|
| MOSI | 11 |
| MISO | 12 |
| SCLK | 13 |
| SS | 10 |
| VCC | 5V |
| GND | GND |
硬體:Raspberry Pi
根據 pinout.xyz 中對於 SPI 的描述,可以找到 SPI 有下面幾點:
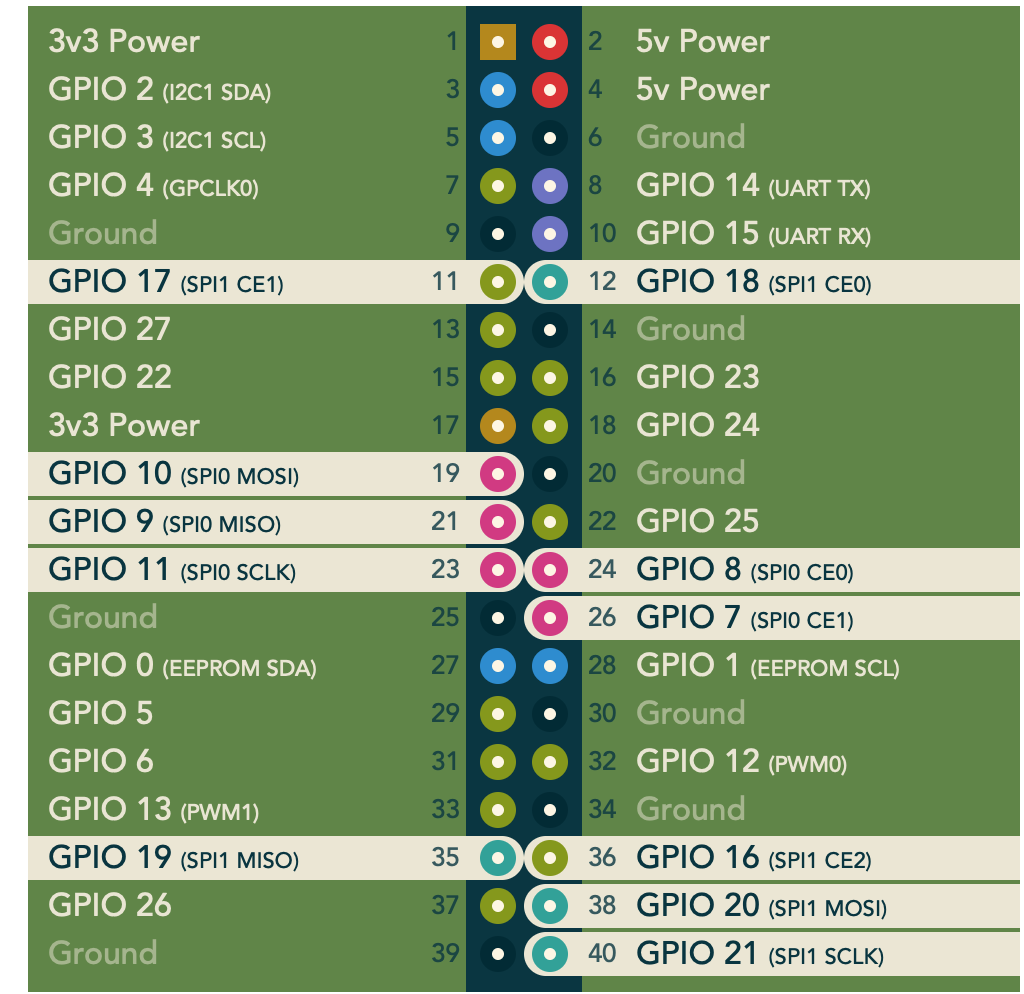
其翁,GPIO 7, 8, 9, 10, 11 的部分,對應到的是 spi0,也就是 rspi-config 會啟動的部分; 而 GPIO 16, 17, 18, 19, 20, 21 則對應到 spi1,由上面的敘述可知:可以在 /boot/config.txt 中加上啟動 device tree overlay 來使用:
"You can enable SPI1 with a dtoverlay configured in "/boot/config.txt""
而至於要怎麼啟動更多的 SPI,可以參考 Raspberry Pi 的 github 帳號中,firmware 這個 repo 中的 blob/master/boot/overlays/README 檔案。比如說要打開 spi1 並且加上 3 個 SS 的話,可以找到下面的說明:
Name:   spi1-3cs
Info:   Enables spi1 with three chip select (CS) lines and associated spidev
        dev nodes. The gpio pin numbers for the CS lines and spidev device node
        creation are configurable.
        N.B.: spi1 is only accessible on devices with a 40pin header, eg:
              A+, B+, Zero and PI2 B; as well as the Compute Module.
Load:   dtoverlay=spi1-3cs,=
Params: cs0_pin                 GPIO pin for CS0 (default 18 - BCM SPI1_CE0).
        cs1_pin                 GPIO pin for CS1 (default 17 - BCM SPI1_CE1).
        cs2_pin                 GPIO pin for CS2 (default 16 - BCM SPI1_CE2).
        cs0_spidev              Set to 'disabled' to stop the creation of a
                                userspace device node /dev/spidev1.0 (default
                                is 'okay' or enabled).
        cs1_spidev              Set to 'disabled' to stop the creation of a
                                userspace device node /dev/spidev1.1 (default
                                is 'okay' or enabled).
        cs2_spidev              Set to 'disabled' to stop the creation of a
                                userspace device node /dev/spidev1.2 (default
                                is 'okay' or enabled).
可以知道:要在 /boot/config.txt 的 dtoverlay 加上:
dtoverlay=spi1-3cs
這看起來也滿好理解的,因為 3cs 就是 3 chip select 的縮寫嘛。而文件上面也有描述到:可以用 <param>=<val> 來指定要用哪個 GPIO 的腳位作 SS,以及要不要在 sysfs 中加入對應的檔案。而這邊為了方便,就使用 spi0 。他們的腳位配置分別是:
| FUNCTION | NUMBER |
|---|---|
| MOSI | 19 |
| MISO | 21 |
| SCLK | 23 |
| SS0 | 24 |
| SS1 | 26 |
| VCC | 1 |
| GND | 9 |
程式
程式:Arduino
由 Arduino 官方網站的 SPI Library 文件中,可以發現 Arduino 的函式庫中,僅提供了將 Arduino 作為 SPI master 的功能,而 slave 端的功能則沒有實作在預設的函式庫中。所以就要土炮地註冊 ISR。而關於這方面的資訊可以參考 Introduction to the Serial Peripheral Interface 裡面的範例。Arduino 關於 SPI 的設定,可以用 SPCR 這個暫存器來設定:
SPCR
| 7    | 6    | 5    | 4    | 3    | 2    | 1    | 0    |
| SPIE | SPE  | DORD | MSTR | CPOL | CPHA | SPR1 | SPR0 |

SPIE - Enables the SPI interrupt when 1
SPE - Enables the SPI when 1
DORD - Sends data least Significant Bit First when 1, most Significant Bit first when 0
MSTR - Sets the Arduino in master mode when 1, slave mode when 0
CPOL - Sets the data clock to be idle when high if set to 1, idle when low if set to 0
CPHA - Samples data on the falling edge of the data clock when 1, rising edge when 0
SPR1 and SPR0 - Sets the SPI speed, 00 is fastest (4MHz) 11 is slowest (250KHz)
事實上,有一些函式庫中函數的實作也只是直接修改暫存器。比如說 SPI.h 中,attatchInterrupt 這個函數的實作 就是直接 mask 上 SPIE 那個位元:
inline static void attachInterrupt() { SPCR |= _BV(SPIE); }
所以在程式方面,就是把暫存器的值設好:
#include <SPI.h>
void setup() {
    Serial.begin(9600);
    pinMode(MISO, OUTPUT);
    pinMode(MOSI, INPUT);
    SPCR |= _BV(SPE);
    SPCR |= _BV(SPIE);
    SPCR &= ~(_BV(MSTR));
}
設定完之後,幫 SPI_STC_vect 註冊一個 ISR。這個 ISR 很單純,就是開一個 circular buffer,有東西傳進去就往上堆:
#define BUF_LEN 128
char buf[BUF_LEN + 1] = {0};
int top = -1;
ISR(SPI_STC_vect)
{
    buf[(++top) % BUF_LEN] = SPDR;
}
最後主程式的地方是 0.5 秒把這個 circular buffer 中的資料倒出來一遍,看看長什麼樣子:
void loop() {
    Serial.println(buf);
    delay(500);
}
程式:Raspberry Pi
在 userspace 使用 python 的程式。這邊函式庫滿多的:pigpio、spidev 等等。這邊則使用 spidev 這個函式庫。要安裝的話可以用 pip3:
$ sudo apt install python3-pip
然後:
$ pip3 install spidev
而程式也很單純:給定 SPI bus 的編號 (也就是 spiN 後面的 N。比如說 spi0 就是 0),以及 Chip Enable 的編號 (也就是 SS,比如說 Arduino 是在 Raspberry Pi 的 CE0,那就是 0)。設定適當的頻率之後,從輸入拿一個字串傳給 Arduino。假定這個程式叫做 spidev-example:
import spidev
SPI_BUS = 0
SPI_SS = 0

spi0 = spidev.SpiDev()
spi0.open(SPI_BUS, SPI_SS)
spi0.max_speed_hz = 5000

msg = input("msg> ");
spi0.xfer([ord(c) for c in msg])
結果
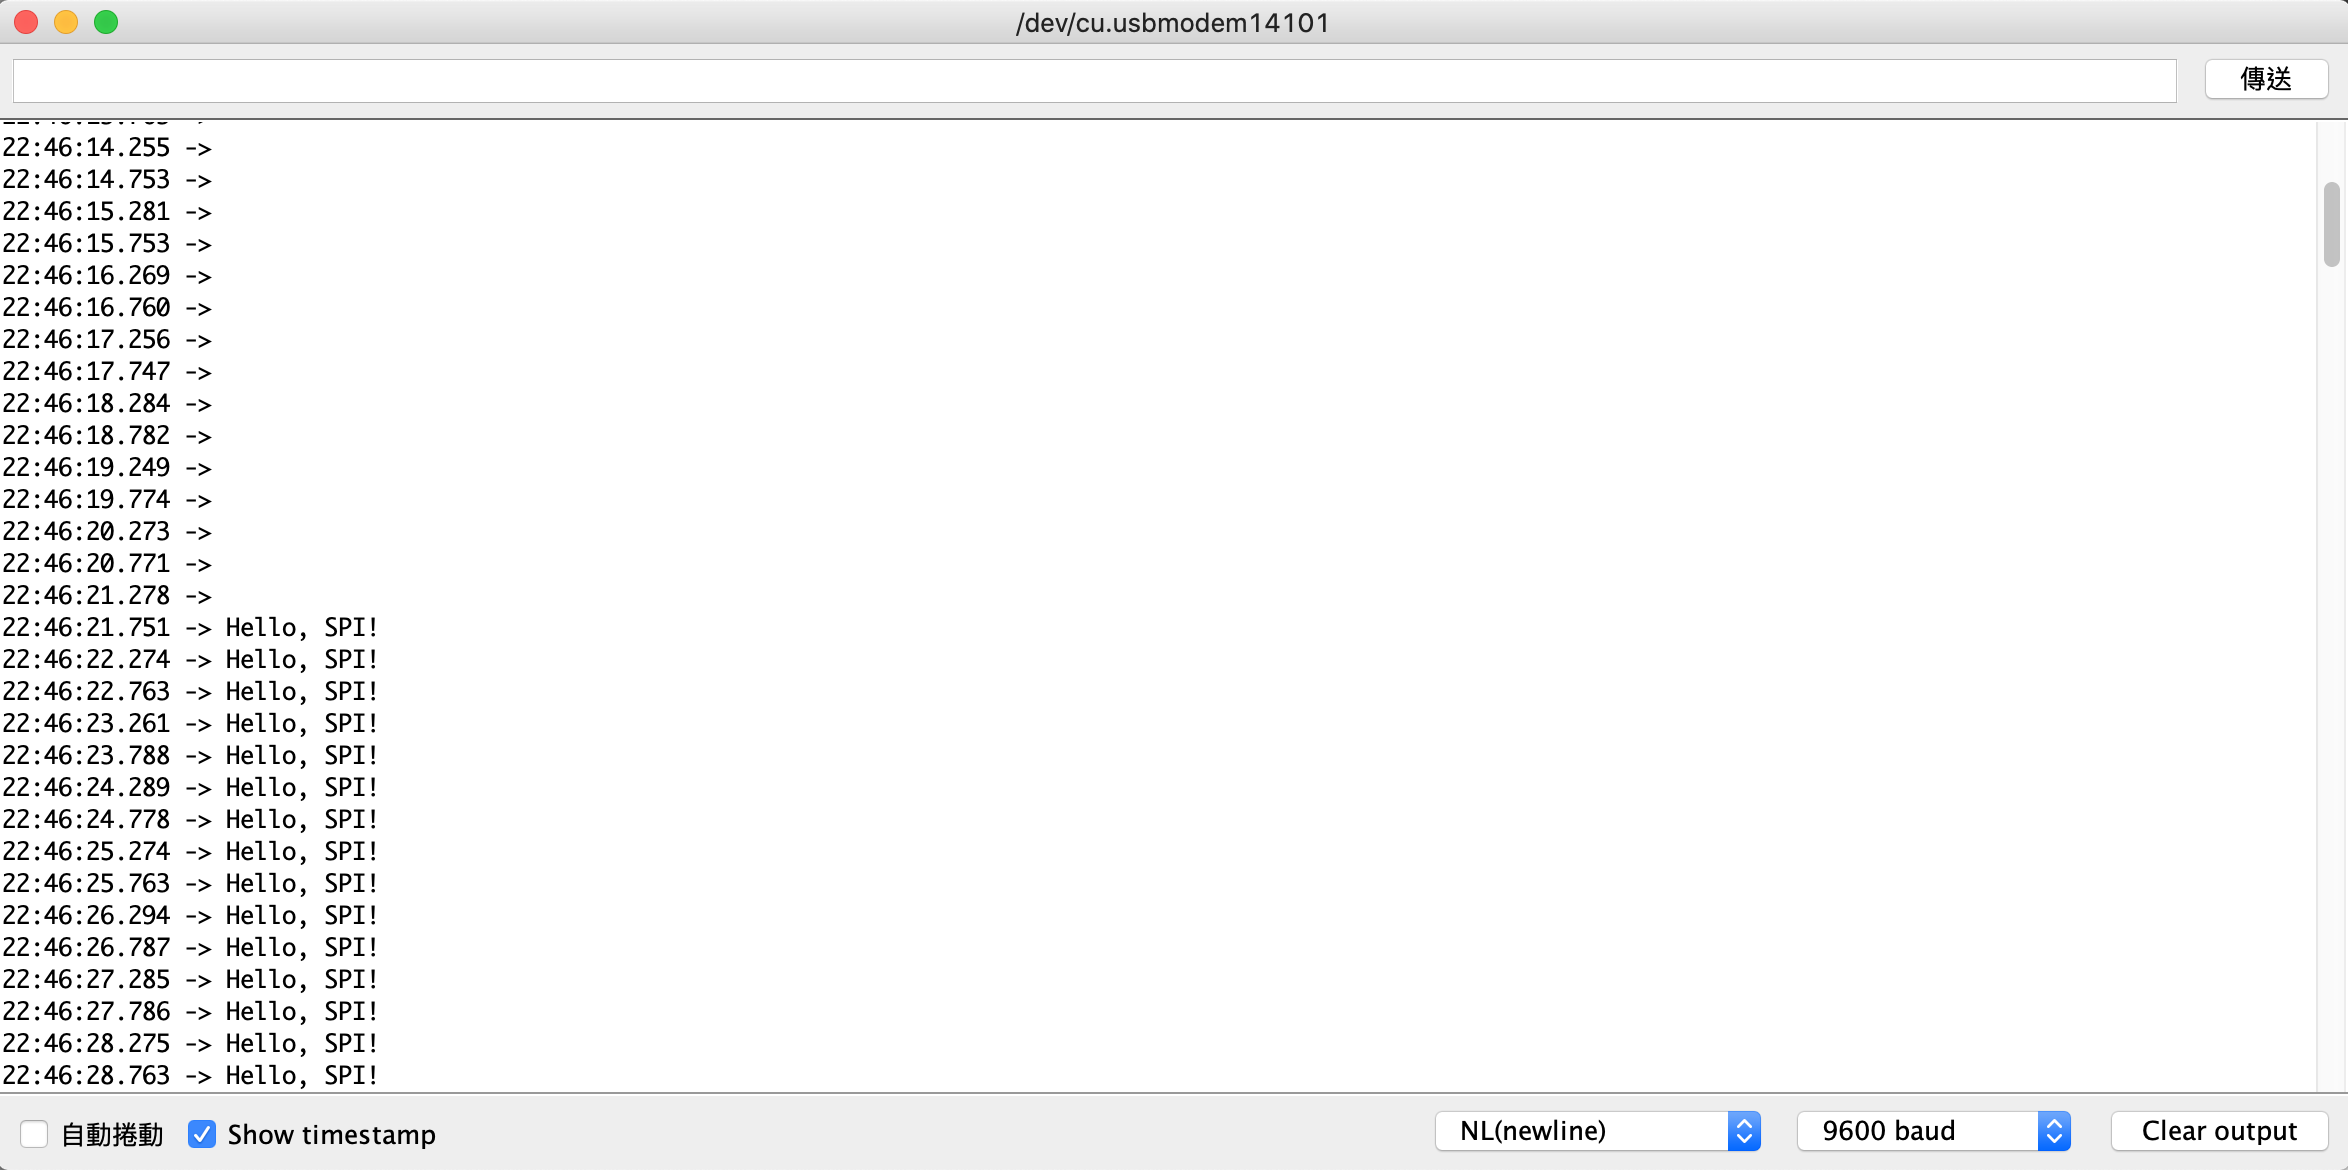
打開 Arduino 的序列埠監控視窗,然後在 Raspberry Pi 上執行 python 程式,並且輸入一個字串 (比如說 Hello, SPI!):
$ python3 spidev-example.py
msg> Hello, SPI!
這時就可以看到輸出了:
追蹤:ftrace 怎麼說?
$ sudo trace-cmd record -p function_graph -a -F python3 spidev-example.py
  plugin 'function_graph'
msg> Hello, SPI
紀錄完之後看 trace-cmd report,然後稍微搜尋一下 spi 有關的東西,
spidev_open
就會發現這個程式看起來像是在開某個 module,而且開的時候用到了某個 spidev_open 函數:
vfs_open() {
  do_dentry_open() {
    path_get() {
      mntget();
    }
    try_module_get();
+   chrdev_open() {
      _raw_spin_lock();
      cdev_get() {
        try_module_get();
      }
      try_module_get();
      module_put();
+     spidev_open() {
        ...
      }
    }
    file_ra_state_init();
  }
}
[...]
spidev_ioctl
除了這之外,也有另外一個 ioctl。而且這個 ioctl 裡面看起來像是在設定某個 GPIO:
do_vfs_ioctl() {
+ spidev_ioctl() {
    _raw_spin_lock_irq();
    get_device();
    mutex_lock() {
      _cond_resched() {
        rcu_all_qs();
      }
    }
+   spi_setup() {
      bcm2835_spi_setup() {
        arm_dma_sync_single_for_device() {
          dma_cache_maint_page();
        }
      }
+     spi_set_cs() {
+       gpiod_set_value_cansleep() {
          validate_desc();
+         gpiod_set_value_nocheck() {
+           gpiod_set_raw_value_commit() {
              bcm2835_gpio_set() {
                gpiochip_get_data();
              }
            }
          }
        }
      }
    }
    mutex_unlock();
    put_device();
  }
}
[...]
spidev_read
最後還發現有 spidev_read:
vfs_read() {
  rw_verify_area();
  __vfs_read() {
+   spidev_read() {
      mutex_lock() {
        _cond_resched() {
          rcu_all_qs();
        }
      }
+     spidev_sync() {
        _raw_spin_lock_irq();
+       spi_sync() {
          mutex_lock() {
            _cond_resched() {
              rcu_all_qs();
            }
          }
+         __spi_sync() {
            __spi_validate();
            _raw_spin_lock_irqsave();
            _raw_spin_unlock_irqrestore();
            _raw_spin_lock_irqsave();
            _raw_spin_unlock_irqrestore();
            _raw_spin_lock_irqsave();
            __spi_queued_transfer() {
              _raw_spin_lock_irqsave();
              _raw_spin_unlock_irqrestore();
            }
[...]
推論
到這邊就可以猜測這個 spidev 可能跟 i2c-dev 類似,是某種揭露給 userspace 的 character driver,然後 userspace 可以搭配 ioctl 等等檔案操作,進行 SPI 的設定與輸入輸出。而事實上,把 spidev_ 系列的函數拿去餵 bootlin,就會發現這些都是 drivers/spi/spidev.c 中的函數,而他正好是一個這樣的驅動程式。
除此之外,也可以發現:spi_sync 這個函數在 spidev 相關的檔案操作的實作中一直出現。
有了這兩個情報之後,接下來就可以以他們為基礎,試著去看核心當中哪些部分負責 SPI 了。